Showing posts with label wool. Show all posts

Tuesday, May 10, 2022

My Kyiv Jacket: Jalie Tania in blue and gold

Well, I made it to Round 3 of the Pattern Review Sewing Bee! This is farthest I've ever gone in this challenge, and I'm enjoying it so far. The challenge set was to make the Jalie Tania coatigan, and make it your own. I've made the Tania previously, so didn't have to do much fitting or tracing, which was a definite benefit as the week-long sewing challenge fell on a week in which I was very busy and short of time. 

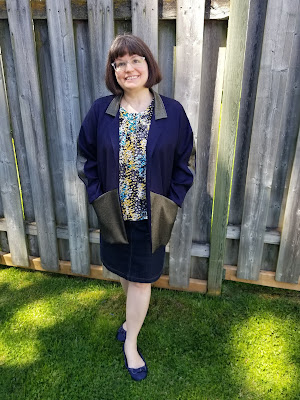
I ran a number of ideas through as possibilities, until I finally decided on making a lightweight coatigan from some navy and black wool challis in my stash. I was taking Kyiv as my inspiration: it is sometimes known as the City of the Golden Domes, and so instead of the bright yellow and blue of the Ukrainian flag, I went with navy and gold in a nod to both. 

I cut my navy wool, and the gold lining I had in mind. I was planning on doing some embroidery and/or stencilling in gold, but when I was making samples I just couldn't get it right. It all looked too "homemade" and not what I was going for. So I decided to make a change.


 I knew I had some gold-toned fabrics in my stash so got them all out and changed the lower part of the Tania. I decided on some bronzey stretch fabric so had to interface it with lightweight interfacing to keep it from stretching out. Matching up those "V"s meant some fussy hand basting to begin with, something I experienced on my last go-round when I was matching up piping points. This bronzey gold seemed to go nicely with both the navy and the more golden lining. 


But I still didn't think it was enough, it needed a little more design. So I made the interior of the collar also in bronze, to highlight it when the collar is turned down. And more importantly, I decided to make a slashed sleeve, both to show off more gold and as a tribute to the church domes that were my inspiration - the oldest churches in Kyiv were built in 1037 and kept getting added to up to the 1850s and beyond, so that stretch of years includes the European fashion of slashed sleeves and doublets somewhere in there ;) 


 I used a strip of 2.5" wide gold fabric, attached to the sleeve which was split down the middle (it's a symmetrical sleeve) with a 1/4" seam, and then folded back together with edges touching. It's stitched down by about 3" at top and bottom, while the middle is left to open and reveal the gold insert. 

This wasn't too hard to make -- the pattern is quite straightforward. I didn't have many fitting adjustments to make, both because I am a fan of the boxy shape, and because I've made it before. But all the additions and changes did mean I had to start over a bit and think about how to put it all together most efficiently. 

While I don't think this was really out-of-the-box or terribly unique (no real changes to style lines or overall appearance) I enjoyed making it. I was pleased with my inspiration, and was also happy to have been able to once again make the entire project out of stash materials. I knew that gold lining would have a perfect project some day!



Tuesday, April 5, 2022

Cobalt Cropped Blazer: Vogue 8612


I've finished the first piece from my Spring sewing plans! This Vogue 8612 from 1993 was one I picked up at the thrift store specifically for the jacket. I doubt I'll make the jumpsuit, although the outfit as a whole is pretty cute! 


It's a particularly thrifty make: not only did I get the pattern at a thrift store but I picked up the wool gabardine via Our Social Fabric, an online thrift shop based in Vancouver. I didn't have quite enough blue fabric for the facings so used some black wool I'd picked up at a local thrift store. I was finally able to pair up a fabulous silky lining fabric I also found at Goodwill. I decided to use a covered button to finish it off -- also from a set from the thrift store! 


I enjoyed making this one a lot. I had to shorten the sleeves by 3" (short arms here!) and I shortened the body by 1", 1/2" above the bust and 1/2" below. If I make it again I won't shorten under, just above the bust point. The great thing about wool is that you can press out any bobbles pretty easily. Some steam and a bit of pressure (with press cloth) got those edges nice and tidy. 


Other changes I made: 

Added a 1/2" inch ease pleat to the centre back lining. While this jacket isn't super fitted, I do like to have that excess ease for movement in any jacket that I'll be working in.

I topstitched the edges rather than understitching the lining -- just couldn't see how I'd get a good line of understitching going after putting the shell and lining together. So used my favourite foot, the 1/4" quilting foot, to get a great 1/8" edge stitch. That is probably the most useful extra foot I've purchased. Great for edgestitching, topstitching and of course any random quilt piecing I might do. 


I finished the sleeve a little differently than the pattern called for, as I wanted a narrow hem. Just folded under 1/4" twice and stitched it down. When I move my arms you can get a little glimpse of the lining at the wrist which is pretty fun. 

And I think that's all! Sewing with this wool wasn't hard at all, and I love how I was able to shape the front seams smoothly with a bit of steam. I really love this combo of colours in this blazer and also am happy with my choice to use a matching button. Very pleased with this one. 


Tuesday, December 7, 2021

Quick scarf making!

I picked up a piece of checked wool at the thrift store (marked at 1.5 yards though it's a bit more) the last time I was there -- it was on sale for $1.63 with the daily discount so how could I say no? It was really nice, and I was sure I could make something from it. 

When I got it home and held it up to myself, I realized that the check was much more square and boxy than I'd anticipated - close up it had a houndstooth vibe but in large view it's really just a mixed check. I wondered what I could do with it. I felt that the print was too blocky to really work as a skirt, and the weight was too stiff/dense for a top... 

As I was pondering my husband wandered by and said, that would make a nice scarf. Bing! The lights went on. This fabric really is perfect for a classy scarf to go with his dress coat. There is exactly 5 feet of length, perfect for a simple scarf, and it is 60" wide. So I cut it into half and half again to get basically a long quarter strip of 15"wide and 5' long. 

Then came the edge finishing. I wondered about what would be best, since there are no woven edges here! I looked up a few ideas, like this tutorial on Threads, and then just went ahead and tested a narrow hem all around. The tricky part was mitering the corners so there would be no lumps. 


You could also fringe the ends for a bit if you like that look, but because this one is trying to be a sleek dress scarf, and it's a bit short for fringe, I didn't go for that this time. 

I'm quite pleased with it. To wear it, it's best to fold it lengthwise and wrap around the neck. Sits smoothly and it's really warm!