Showing posts with label tutorial. Show all posts

Friday, November 8, 2019

Scrappy Desk Bunting!


What do you do with all your teeny tiny scraps? Not the ones big enough to make pocket bags or bias binding from, but the itty bitty ones that generally go into the textile recycling bag?

I don't like to waste anything at all, and thought that there must be a use for these bits, aside from doll house furnishings or the classic confetti fabric. I also like to go thrifting a lot and one of the things I often find is old packages of bias binding. These merged into the idea for some Scrappy Desk Bunting! Cheer up your office with your sewing scraps :)

I have been thinking about this little project for a while, and finally gave it a go using a pile of my tiny scraps from this year's sewing so far. 


I used a length of narrow bias binding and freely cut triangles of an appropriate size -- about 1/2" wide on the top of the triangle. I cut pieces of mostly cottons with pinking shears to reduce any fraying.


I laid them out along my length of bias binding to test the colour balance, then stacked up the bunting bits in that order to prep for sewing.

A bright mix

A more muted colour palette
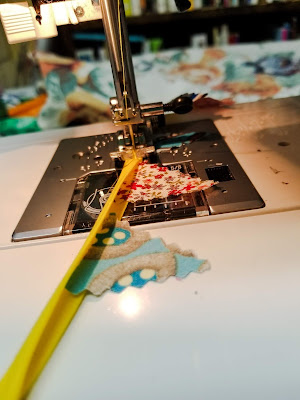
The process is actually quite easy. I turned the ends of my binding under inside the fold, and then started stitching in a matching colour. The only issue is that it's hard to get started neatly -- be sure to hold your thread tails firmly behind your first stitch so that the stitching 'catches' and your binding doesn't get all knotted down into the feed dogs.


Leave yourself about 1.5 inches of stitched together bias on each end to allow room for pins to hold it up. Then start tucking in your triangles two at a time - make sure they're tucked right up to the top of the fold and stitch along the bias tape, closer to the open edge. This works better if you sew a bit more slowly than usual. If you notice that you've missed the edge of one once you are done, just unpick above that triangle and resew. It's very forgiving! This does work most smoothly if you ensure that the top edge of your mini triangles are even - there's not much room for variation inside that teeny fold.


Then just keep sewing! I found that the optimal length of a mini bunting equals 25 triangles, with a little breathing space between each one, plus that extra length at each end to facilitate hanging them up.


These can be any colour you like -- multicolour scraps with bright bias binding (my obvious preference) or all one colour, or even all one fabric.


You might want to make a holiday themed Mini Bunting with bits of red and green, or silver and gold. It all depends on your supplies -- what little scraps do you have lying around? And which colour of binding is handy? If you make your own bias binding, you'll have a double scrapbuster of a project. 

This is a fun way to use up tiny scraps, and it's a pretty quick project too. I made three in quick succession. I can envision a variety of colours to add seasonal cheer to one's desk all year long! Tucked inside a birthday or celebration card, this would add that little something extra to someone's day. So many ways to sew up our tiny scraps and keep them in use :)

Saturday, January 2, 2016

Ladybug Infinity Scarf: A Tutorial & A Giveaway

I made myself an infinity scarf before Christmas, so that I could use a super cute fabric I'd found. When I shared it, Beth in AL asked if I could share how I'd made it. Even though there are tons of methods for infinity scarves online, here is a tutorial on how I made mine. The fabric I used is a thin but fairly non-stretchy knit, which isn't very soft or drapey. If you used a finer, soft knit it wouldn't have so much body but it would be squishier. So pick what you like best!

Start with a piece of 60" wide fabric, cut to 18". You don't have to be precise, just try to get it around 18" and cut as straight as possible but don't get frantic about it. This project works with the freehand style that I like to follow with quick projects!


Trim off any unsightly selvedge edges.


Fold the entire width right sides together, and stitch along the long edge, leaving both short edges open. You can use a zigzag stitch or a straight stitch, or a serger if you have one, for neatness.


I sewed my seam at about 1/2 inch. I didn't bother with pins, as my fabric was stable and was easy to hold together at the seamline evenly. If yours is slippery or stretchier, you might want to put in a few pins to keep it from getting too uneven as you sew.


Because I was cutting and trimming the original piece pretty casually, when I got the long ends sewn, the short edges were uneven. No problem, just trim them so they're nice and straight.


At this point you can press the seam if you like; it makes it sit nicely. I didn't bother finishing my seams because a)knit, so no unravelling and b) it'll be on the inside.


Now you'll turn the tube right side out. Look at the ends -- you could sew them together by folding one edge under and tucking the loose edge inside and sewing straight across -- but I don't like that method as it anchors both sides of the the seam flat. I like my infinity scarf to be a fully open ring of fabric that can fluff up properly.


You could also sew the ends together with the seams lined up...


...but to give the scarf that little bit of extra oomph, I like to twist the ends and sew the seams opposite to one another; that gives the scarf a little bit of lift when you wear it, with a twist built in.

So, take one end at the point opposite the seam.


Place it right sides together against the seam on the other end. You might want to pin this spot for starters. I don't like to use pins while sewing this part though, as the seam gets pretty twisty and pins just aren't that useful. Use your fingers to hold and direct the fabric instead.


This is the confusing part. The ends will be sewn in the round, and it feels pretty odd. Just start your seam a little above your pinned mark, as it's easier in the end to handstitch the remaining opening closed if you don't have extra seam allowances to worry about as well.

I sew this seam at about 1/4". The key thing to remember is to just keep sewing, and to make sure that you only have 2 layers of fabric under your needle. Don't get the other side of the fabric caught up as you keep turning your scarf ends.


Sew slowly for as far as you can -- the closer you can get to your starting point, the less you'll have to handstitch closed at the end. Unless of course you like handsewing, in which case, don't worry about getting really close.


When you take it off the machine, it looks like a mess. You may be asking yourself "what am I looking at?"


But just carefully turn the seam and it pops right into place with the insides inside and the right side facing out. Then you have to close that small opening that remains.


 I've tried machine stitching close to the folded edges before, and it works but it doesn't look as neat as hand stitching. Depends what you want to do.


Anyhow, that's it. Then just put it on, give it a loop, and fluff up the fabric a bit. Perfection!


Special news:

To celebrate making another ladybug scarf for this tutorial, I'm going to give it away! If you're interested in wearing this loopy scarf, leave a comment here telling me why. This giveaway is open to anyone worldwide.

This is a short-term giveaway -- entries will be accepted until 5 pm EST on January 7th, 2016 (Christmas on the Julian calendar).  At which time I will draw a name from all the entries and give it away as a Ukrainian Christmas gift! Thank goodness I get to celebrate twice :) 

Worldwide entries will be accepted -- just make sure I have some way of getting in touch with you in case you win, whether it's already in your blog profile or left in a comment if it's not.
*****************

Sorry for the delay in posting the winner of this draw. I wanted to be sure of my supplies, so I could do this...

Since there were only four entries for this scarf, and I have another yard of ladybug fabric to use up, I get to do an Oprah -- YOU get a scarf, and YOU get a scarf, EVERYBODY gets a scarf!!

Seriously -- Anne, R Trittel, Annie, & Kim -- send me your mailing deets & I'll get your ladybugs flying away home as soon as I can :)


Wednesday, May 28, 2014

Obi Belt + Hidden Pocket: A Tutorial

I'm sharing a recent project I put together when I was wearing an outfit short of a pocket. Here's my take on the ubiquitous Obi Belt, this time with a hidden pocket to store all those little necessaries like keys. I hope my free-form sewing makes sense to you!


Obi Belt with Hidden Pocket

Materials:
About 1/2 metre of 60" chosen fabric (knit or heavy woven)
Scrap of fabric for pocket (I used a silky polyester from a dress project)

I started with a favourite obi from another dress, and traced around it, then split the "fat" front panel into a separate piece from the ties (to fit onto a regular piece of fabric). My original RTW inspiration was made from a stretch fabric, and I found this piece of heavier brown knit with a thread of gold in it and thought it would work beautifully. I bought 1/2 metre of 60" wide fabric, but you might want a slight bit more, as I ended up piecing the back of one of the ties.

You could start with a more specific pattern, say Mimi G's downloadable version, or even the belt pattern from New Look 6120 or 6144, or anything similar that you may already have. You may have to make a few alterations to the pattern, though!

What you need to start is two pieces for the front panel, and four for the ties -- you could use only two for the ties if you have a double sided fabric that won't show a "wrong" side when you tie them, if you want. In that case, the final steps will be slightly different. You will always need two pieces for the front panel, though, so that you can sandwich in a pocket.


Remember to cut these out on fabric folded right sides together so the orientation is correct


Next you'll want to put a pin in the centre of one of the front pieces - just fold it in half and pin mark the centre. Use a piece of tissue or paper and place it about half way between the centre and the outer edge and draw a pocket shape. Make sure you leave enough room at the bottom to allow for the seam allowance (1/2 inch) and a bit of wiggle room.


Use this pocket pattern to cut out your pocket pieces from scraps, right sides together.


Pin one piece to the front panel, right sides together. Lay the other front panel piece alongside and pin mark the placement for the other pocket piece. Remember to mark this with the right sides of the front panel pieces together so that your pocket pieces end up on the same side!


Sew the pocket on with a 1/4" seam 


Flip the pocket out so that the front panel and pocket are both right sides facing up. Give it a press to smooth it out, and then understitch the pocket piece to help keep it from rolling out when you're wearing the belt -- this is a hidden pocket, after all! Do the same for both sides.


Pin the two front panel & pocket pieces together and sew with a 1/2 " seam allowance. Stitch along the long side, pivoting and stitching around the edge of the pocket pieces and then to the end of the belt. Notice that you leave the pocket opening where the pin is in the photo. Trim the seams.


Stitch each of the the two matching ties together along one long end, then pin to the prepared front panel piece. Stitch with a 1/2 " seam allowance. Trim. Do this for both ties.***


Fold right sides togeter and pin all the way around the belt, remembering to leave an opening to turn the belt. It's best to do this nearer the centre so that the larger middle isn't too difficult to turn through a really narrow tie end.

Trim the seams and snip off the point of the ties, it makes it easier to turn and poke out the ties afterward.


Carefully start pulling the belt inside/right-side out. You may want to use a chopstick to gently encourage the tie ends to turn out completely. Don't poke too hard! You don't want to jab through the fabric. Give it all a good press when done.


You'll note the opening left between the two pins here that we've just used to turn the belt right-side out. Depending on your fabric, you'll either want to slipstitch this closed by hand or if  you are using a thicker, busy fabric like I am, that hides the stitching really well, you can just topstitch it close to the edge, turning in the seam allowances first.

Like this.


Ta Da! What a cute belt. Press it neatly and wear proudly.


Enjoy our little secret...


***If you are using fabric with indistinguishable right & wrong sides and want to use a single layer tie rather than a sewn and turned one, your process will be slightly different. When sewing in the pocket, sew both long sides of the front panel closed, leaving the short ends open. Press a 1/2 seam to wrong sides and turn right side out. Slip in the ties (finish the edges first) to each end, pin and topstitch in place. A bit of a different look but also a bit faster.