Showing posts with label tops. Show all posts

Tuesday, July 16, 2024

Impulse Sewing: a yellow print top

I made a quick boxy top this week, totally unplanned and not at all what I had scheduled in the sewing room! I was given just over 1 m. of this yellow polycotton by a coworker, and I picked up a couple of older sewing patterns at the thrift store a day or two later. They came together serendipitously and I quickly made a pullover top; the square neckline appealed to me! 

This is a crisp fabric, even after washing, so the shape is really boxy. But I really like the print and the way the neckline holds its shape. I can wear it tucked in or loose over something, although I think I might add some side slits to make that option a little more comfortable. 

I used a pattern from a series that was connected to a book that you got pattern instructions to file into, and then the matching patterns. I've seen quite a few of these patterns while thrifting (even own a few more) but have never seen the instructions to go with them. The patterns are all pretty clear, though, if you've been sewing for a while, and this one in particular was very easy so no instructions were needed. 

I measured the pattern pieces, and took 1/2" out of centre front as well as shortening it by using the lengthen/shorten line on the pattern - that was perfect. I added interfacing to the facing pieces, and sewed it all up pretty quickly. The sleeves had a bit too much ease in the sleeve cap for my liking; there were puckers in the shoulder seam. They are minor and unnoticeable due to the print but I will probably redo them to get a smoother finish at some point! 


This was a fast project, and a colourful one. I like a pullover top, and I love the colours of this fabric. It's very simple, so not perfect; there are no bust darts so the fit can't be adjusted much, for example. But as a quick & easy make it did the trick!

Tuesday, May 7, 2024

Fresco Blouse in Cobalt Blue

I put the Fresco Blouse by Studio Calicot onto my MakeNine list in 2023 so it was time to finally make this pretty pattern! With the additional impetus of the #SewAprilBlouse24 challenge on Instagram, I got it finished just before the end of the April -- the evening of the 30th to be exact ;) 


I really like it -- I decided to use this cobalt rayon from my stash as it is very fl9uid. It was the perfect weight for this flowy pattern. This is quite an easy pattern, except for the fabric handling when you are using a slippery rayon challis. There is a front and back piece, a neckline tie, and a shoulder placket for buttons so you can get it over your head. It all went together very nicely; just remember to turn your necktie piece right side out before you sew it on...


It is a soft, roomy, and pretty top. I might shorten it a bit as I am pretty short and I'm not sure I like it ending at the widest part of my hip. However, I am going to try it tucked it with a couple of skirts and see if I like it that way. If not, I think I'll take another inch off the length. 

The shoulder button placket takes 2 small buttons, just enough to give you room to slip it over your head. The tie takes a little finagling to get right, as you want it to fall nicely. But it's a relatively quick make and certainly a comfortable wear. I like the 80s aesthetic of a lot of her designs and this one is easy and fun. Very pleased that I finally made a version of this! 


Tuesday, April 23, 2024

Burda Knot Front top

PatternReview is running an upcycling contest this month, and that gave me the push to try a project I've been thinking of for a while. I received quite a bit of fabric, including a few finished projects, from a friend a year or two ago. One item was a gorgeous blue shift dress in a linen/cotton or rayon blend, I think - anyhow it's beautiful. I tried just fiddling with it a bit to see if I could make it fit me but it never worked. The neckline & shoulders were just too big, and the hip area too small. 

So I took the plunge and cut it up! I laid out a few simple tops but found that this Burda top (109-08-2021) worked best with the available fabric. Plus it has this very cute knot feature at the neckline, which I have wanted to try for a while now!

I cut everything out except for the armhole facings; I ran out of enough fabric to cut these longish pieces. I could have pieced the remaining bits and probably had enough, but didn't want a bunch of seams on the arm facings, might be uncomfortable. I looked through my stash of vintage bias binding and found one pack of a perfect blue. So the armholes are finished with binding instead!

Another change I made was to cut the back piece across the existing back seam of the dress. There is a back neck slit in the pattern but I sewed together the neck facing and tested it to see if I could get it over my head without unpicking the back piece to get an opening. It fit very easily. So I didn't put it the back slit. I always hate that fiddly button loop anyhow, haha. 


I cut this in my usual Burda size, 42 at the neck and 44 at the hip. There is not much leftover scrap fabric from this one, and I'm so pleased that I can wear this glorious fabric now. It will be a great piece for summer days! 


Tuesday, March 12, 2024

Two Tone Burda Top

I finally finished this project which I've been thinking about for ages, and cut out in February! For some reason it took me a while to finish this Burda 6354, even though the pattern is pretty simple to put together. The fabric I chose is lovely but also a bit shifty, so needed careful sewing. 

The colour choice is influenced by the colours of Ukraine; when I saw these two fabrics side by side at Fabricland, I immediately thought of a project like this. It's a fairly easy pattern -- there are match points for the gathers and corners, and you can use prints, or solid colours like this, to add some verve to the design. 

There are two views, one shorter with ruffled short sleeves and one with full length straight sleeves that is a bit longer. I used the longer length with the shorter sleeve. The only closure is a button at the back neckline slit, so it's not very complicated to put together. It took me a while only because I wasn't getting in much sewing time over the last couple of weeks, and because the fabric is so soft and slippery that I had to be careful with both pressing and stitching. 

In any case, it turned out like I'd imagined it, and I really like the fit. Not too oversize in the shoulder/bust but nice and swingy otherwise. I also like the sleeve design. A lovely project once I finished it! 

Tuesday, January 30, 2024

ITS Palermo: first Make Nine project!

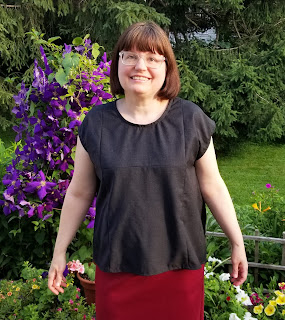
One of the patterns on my 2024 #MakeNine list is the Palermo peasant top, from the Itch to Stitch book Sew Beautiful. When I mentioned last year that I was looking for patterns in this style so I could make my own Vyshyvanka, someone on IG recommended the Palermo. It's definitely in the running! 


I used a small piece of remnant fabric from my stash - it's a suiting fabric but fairly light and not stiff, so I decided to use it. I liked the idea of mixing a peasant blouse with suiting fabric! I had just enough. I cut a size 8 at the neck & shoulders, grading to a 12 at the hip. It's more closely fitted than I was expecting, even though I double checked the sizing, and did choose the right sizes according to my body measurements. I might make it one size up next time, although I like the neckline at size 8. 


It was actually a very quick project! Front, back, sleeve and neckline bias casing. The front has a seam up the middle which is pressed flat and topstitched. Fortunately the stripes worked out for me! The neckline casing is sewn on, elastic inserted and there is also elastic at the sleeve cuffs, though it's a nice gentle gather, not a tight ruffle. I like that as well. 

I added one inch to the length when I cut it out, but didn't alter the sleeve at all, except for making a slightly larger hem for my elastic. I don't think I would want the sleeve or the body any shorter, for me. 


I do like it and think the closer fit works with this fabric. But not 100% convinced that this is the right Vyshyvanka base, so will continue trying out a few more options before committing to embroidery. 


Tuesday, August 1, 2023

Linen Santa Rosa Top


I made another Santa Rosa! Actually, I made this top before the dress, to test out how the unfamiliar placket worked. You can also see this project on the Liesl & Co blog now, as well. 

Here I made the top view only, but it's very similar to my dress version, in that I left off the pockets, as I'm not a huge fan of breast pockets. The main difference with this (aside from length of course) is that I left the placket loose, no buttons at all. 


This linen blend is a stiffer fabric than called for in the pattern, so the interfaced placket is quite sturdy, in the sense that it will hold its shape and place - I don't have to worry about gaping and sagging with it. So it works out well just leaving it as is. It's not too low, and the way it sits means that unless you are doing some active moving about, it's not going to reveal anything.

I left the length of the top at the pattern lines, and quite like it. I was worried it might be too cropped for my tastes, but it really isn't. I have a higher waisted skirt in my closet (Butterick 5466) which is perfect, as it removes any concern that my midriff would show when I raise my arms. 

This top was such a quick and simple project. I really like the way the placket is constructed on the Santa Rosa, it made it easy to get a good result on the first try. And the standing collar is a little different and gives this top that extra flair that makes it a good addition to the wardrobe. Also, this fabric is a remnant that I've used in two previous projects, and is now mostly gone. It's also very light and cool for these summer days. A win all around! 

Tuesday, July 25, 2023

A Matchy Matchy Skipper Top

I recently signed up to be a tester for a new pattern by the Matchy Matchy Sewing Club. I haven't done this kind of thing for ages, but I thought that their new Skipper Top & Dress pattern was really cute -- and it's available now on their website!

This is reminiscent of their very popular Collage Gather Top, as it's also a panelled boxy top with gathered sections. The Skipper has gathering on the central panels, though, not the outer ones like the Collage, which appealed to me a little more. 

There are 3 views in this pattern - a short top, a mini dress/tunic, and a midi. I just tested the top view, but am planning on making the short dress as well in future. The patch pockets on that view are very cute. 

The style of Matchy Matchy is quite patchworky and quirky, with many of the samples on their website made of patchworked gingham. The patterns lend themselves to this kind of sewing, with their multiple panels. They also lend themselves to using small pieces of fabric, because of that panelling. 


I went to the other extreme with my version - I did an all black top! I had a small, lightweight greyish-black piece of cotton poly that I picked up at the thrift store a while back, because I liked the weight and drape of it. It was just perfect for this top. I decided to use the flat front view (there is also the option to gather the front panel as well as the back). After tracing and measuring, I also decided to add 3" to the length, as I'm not a real wearer of cropped items. The pattern has been adjusted in its final form to have a bit more length on the top and mini-dress views, so I probably won't have to make this adjustment on any future projects and neither will you if you make it!

The neckline is finished with a bias facing, and unfortunately my fabric didn't press as nicely as a cotton would so I did end up with a few bumps in my neckline finish, but that's a small issue. The fit on this is perfect for me, and I really enjoyed making it. The mini-dress has fun pockets and I'd make that with the gathered front panel. The midi has a side seam pocket option. I think that this is a quick and straightforward make and would be a good addition to the collection for newer sewists, due to its easy construction. But it would also be a good one for anybody who likes to use scraps, colour block or pattern block their projects. In basic black this is going to be a go-to for me. 


Tuesday, July 11, 2023

Afternoon Blouse in Green


I just finished this Afternoon Blouse by Jennifer Lauren, a pattern I've been meaning to make since I bought the pattern at least 5 years ago! The PatternReview "Fabric & Pattern Stash" contest spurred me on to finally get this one cut out. 

I traced a size 12, grading out to 14 at hip. It is fairly simple, with only front, back, and facing pieces. And I used a remnant of green linen blend of some kind which I got from a friend last year, when she gave me two plastic bins of fabric from her mother's sewing stash. I had just enough to cut out the blouse version of the Afternoon Blouse & Shift Dress. 

The fabric was fairly loosely woven, so I did have to zigzag all the edges of the pattern pieces as I cut them out. But there aren't many, and this went together quickly. I used a lightweight interfacing for the facing pieces, which was just right for the softness of this fabric. I did find once I tried it on that it is a little tighter around my upper arm than I like - I may upick the shoulder seams and restitch at 1/4" just to give me a touch more room. I will add a bit to the pattern pieces for future use. 

Otherwise, the only thing I had to watch on this one was getting the overlap to sit correctly. Because my fabric has a bit of a softer hand, I found it wanted to droop. I had to press the front seam and the overlaps in place, then pin them in order to put in the line of hand stitching that holds the overlaps together -- I did it quickly the first time, then realized I had to pick it out because I hadn't carefully arranged the placement and there were sags and droops! I placed the top on my dress form after pressing so that I could get the alignment right, and then restitched the overlaps together, and added the button. Actually, looking at the photos I think I might readjust it again to get rid of the little pucker near the button!

It was kind of fun digging through my button stash to find a single button I liked for this top. The one I had in mind first didn't actually work, so I looked again and came up with this pinkish toned one, which is slightly smaller than the recommended size but I think it looks nice. 

I like the way this fits, aside from the slightly tight arm opening, which is fixable -- it floats over the body and feels just right. I will definitely be trying the dress view next. 


Thursday, May 25, 2023

Vyshyvanka Day and big plans for 2024

Vyshyvanka Day is a relatively recent celebration, held on the 3rd Thursday of May each year. The aim is to celebrate traditional Ukrainian embroidered clothing. The idea of Vyshyvanka Day was suggested in 2006 by Lesia Voroniuk, then a student of Chernivtsi University, and has grown to involve all of Ukraine and the Ukrainian diaspora across the world. 


I've worn my store bought Vyshyvanka the last couple of years (a gift from my sister). But as I have mentioned previously, I would like to make my own to wear next year! So I'm planning on starting now, to hopefully get it done by next year ;) I won't be making a fully traditional, heavily embroidered one, since I don't have those skills. But I have a few patterns to try out for the base, first, and then I'll choose some less complex embroidery that I want to add. 

Here are a few patterns that I already have in my stash, which might work with some small changes or adaptations. I hope to try them out and see how I like the fit before choosing the one I like best to embroider. 

First is this older pattern, Simplicity 3786. While there are some pintucks in the centre panel, I do like the sleeve and overall silhouette of the view she is wearing.

Simplicity 3786

Next up is this more recent McCalls 8042, which I picked up in a sale just recently. I really like View C but am not quite sure about that neck ruffle bit. Probably would change that!


McCalls 8042

I also have two Indie patterns that have potential -- one is the Love Notions Rhapsody Blouse. This gives a little bit more of a modern shape to the traditional blouse, which I might like.


And the other, which might be the most likely of all of these to be the one I use, is my recently purchased Poppy Blouse by PatternScout


There is also the option of making the blouse in the traditional manner, which is just following body measurements and cutting mostly rectangular pieces. There is an example of this in the book Ukrainian Embroidery, by Ann Kmit, which I might follow. Or if I'm lucky enough, I might be able to take a sorochka pattern class with Myroslava Boikiv from Toronto. 

With all of these options, I see some fitting muslins in my future. Then, on to deciding on the embroidery patterns -- and that's the more complicated bit, both the choosing and the stitching! And that's why I'm starting a year ahead :) 


Friday, April 21, 2023

Another Mandy!


When I was recently making the free Athina Top from Tessuti, I started thinking about some of their other free patterns... namely the Mandy Boat Tee, which I've made a few times now. This is one of my fave t-shirt patterns, as I like the silhouette and fit, and it's really the only kind of 'tee' I wear.


Well, this seemed to be the perfect fit for this piece of lovely soft knit I had in my stash. I received this fabric from a library patron who knows I sew; she was clearing out her stash a bit and thought that this print would be perfect for a librarian. She was right! 


I was pleased to find that there was enough fabric here for the Mandy, with just a sliver left over. I cut it carefully, trying to get the centre line of the print down the centre of the front and back. I think it worked! I really like how comfortable this top is, and in this super soft knit it's really fabulous.


I made it with the minor fit changes I have figured out for myself - basically adding 1/2" width to each sleeve at the seam, and making the neckline slightly narrower. The neckline finish is a nice touch, with a dart of sorts put in at the side seams of the neckline; it makes it sit so smoothly. Something to note is that this pattern does have quite limited sizing.


The only small difficulty I have with it is that the fabric is so very soft and stretchy (maybe a bamboo knit?) that it has grown a little in the 3 times I've worn it since I finished it. The hem is a little longer than it was originally! Otherwise I really love it, and hope that the patron who gave me the fabric will pop back into the library on one of the days that I'm wearing this :)