Showing posts with label thrifty. Show all posts

Tuesday, July 16, 2024

Impulse Sewing: a yellow print top

I made a quick boxy top this week, totally unplanned and not at all what I had scheduled in the sewing room! I was given just over 1 m. of this yellow polycotton by a coworker, and I picked up a couple of older sewing patterns at the thrift store a day or two later. They came together serendipitously and I quickly made a pullover top; the square neckline appealed to me! 

This is a crisp fabric, even after washing, so the shape is really boxy. But I really like the print and the way the neckline holds its shape. I can wear it tucked in or loose over something, although I think I might add some side slits to make that option a little more comfortable. 

I used a pattern from a series that was connected to a book that you got pattern instructions to file into, and then the matching patterns. I've seen quite a few of these patterns while thrifting (even own a few more) but have never seen the instructions to go with them. The patterns are all pretty clear, though, if you've been sewing for a while, and this one in particular was very easy so no instructions were needed. 

I measured the pattern pieces, and took 1/2" out of centre front as well as shortening it by using the lengthen/shorten line on the pattern - that was perfect. I added interfacing to the facing pieces, and sewed it all up pretty quickly. The sleeves had a bit too much ease in the sleeve cap for my liking; there were puckers in the shoulder seam. They are minor and unnoticeable due to the print but I will probably redo them to get a smoother finish at some point! 


This was a fast project, and a colourful one. I like a pullover top, and I love the colours of this fabric. It's very simple, so not perfect; there are no bust darts so the fit can't be adjusted much, for example. But as a quick & easy make it did the trick!

Tuesday, October 31, 2023

I AM Barbara in Skull & Crossbones

I've had this project in mind for a few months, and with a weekend of intense sewing, managed to get it made in time for my Halloween workwear! 

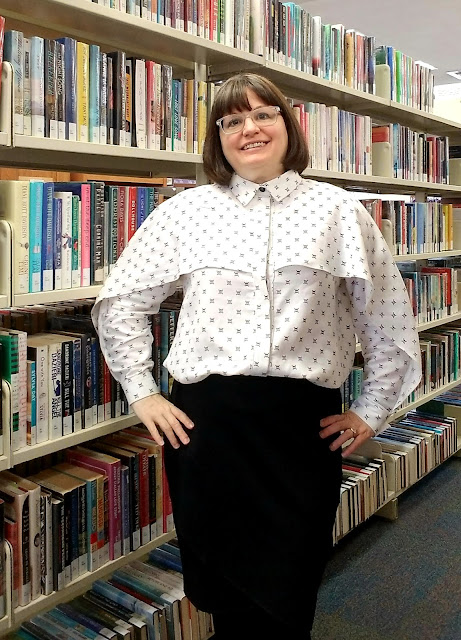
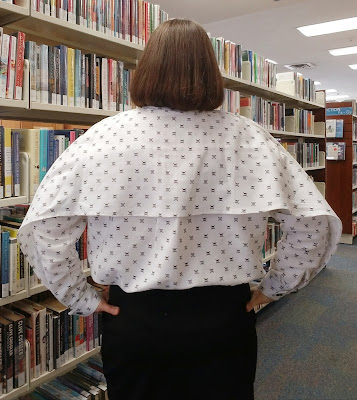
The I AM Barbara blouse caught my eye a while back - I don't have anything like it; it was the flounces that interested me. I like the ones with the least flounce to them, and thought that this fabric was a perfect match to this design. I bought it with this project in mind, and happily it all came together just as nicely as I'd imagined in my head! 

The fabric was originally a 100% cotton IKEA sheet, which I bought at the Goodwill. When I saw it, it looked like a repeated print in black & white, which fits into my wardrobe parameters. But when I looked a little closer, I saw that it is tiny skull & crossbones. How delightful! 

And, the fabric is very soft and light, so I thought that a double layer, like in the Barbara blouse, would work well with it. It wouldn't be too bulky, and it would also be a bit more wearable if two layers make it a tiny bit less transclucent. 

I really enjoyed sewing this, even if I was pushing myself to finish it. The instructions were clear, even with some fussy bits like the front hidden placket piece.

I ended up not doing it perfectly but close enough to wear and be functional - that's all I ask! I also made a small boo-boo on one cuff, which buttons the opposite way to the other, but that's easily fixable but removing and replacing that cuff. I will do that at some point ;) 

I cut a 42/44 with a little more width at the hip/hem. And I had to shorten the sleeve by 5/8", which meant also shortening the flounces. I didn't take any length off the body of the blouse, in fact I added 1/2" to the bottom to give me more hem allowance. I think that it's just right. 

I used flat black buttons for the placket, but used 4 hole buttons for the collar and cuffs (the visible buttons) so that I could stitch them on in an X pattern using white thread, to echo the print. I really love everything about this! 


The fabric is so soft to wear, and works really well with this design. The only slight drawback is that it needs a lot of pressing! I love it and am so glad I pushed to get it done. This is an interesting design that I enjoyed making, and I also love the fabric a lot. 


Tuesday, October 24, 2023

A Lined Jerkin from Sew Different


I had a sudden urge to make this quick layering piece this month. The Lined Jerkin by Sew Different is a pattern in their Layer Up Collection. It's the free pattern from the set, and so I thought I'd give it a try. 

I had a remnant of black and white wool blend in my stash, which I picked up at a thrift store ages ago. I'd always wondered what I could make of this small piece, which had one small hole in a white section of the print. This pattern fit onto my 1 m. piece easily, although I did have to mend the hole first as it was pretty much in the middle of the back pattern piece. But that was fairly easy. 

Mend: I took a matching section from the cutaway scraps and placed it underneath. Then I stitched over it with matching thread (by hand) to first secure it down, then tried to follow the weave to attach both pieces together. I then trimmed the inside piece so it wasn't too bulky. You really can't tell once you are more than a few inches from the fabric. Then I went ahead with construction.


Inside patch

 
Outside after mending

Making it was easy - it's a boxy layer to throw on over a tee or dress, with a lining to make it easy to get on and off. It's essentially the same piece but with a deeper neckline on the front piece. They're attached and then the lining sewn in at the neckline, the armholes edges turned under and hand-stitched, and the outer fabric encloses the lining at the hem. I did lengthen it by one inch but might remove that...haven't decided yet!

It's quite cute and I like it in this fabric. I think if I made it again, I would narrow the front piece by an inch at centre front just to suit me better. But I think it's a fun idea that will add some variety to plainer underlayers. And it was a quick make that allowed me to finally use this fabric! 

Tuesday, October 3, 2023

Warm & Cozy Sewing for the Season


I was inspired to sew up a Warm & Cozy project for the fall, thanks to the PatternReview September contest of the same name. (And you can now vote for my project here, if you are a PR member!)

I had picked out a pattern that I wanted to make (Simplicity 2289, by Patty Reed) but hadn't found the right fabric in the stash. Then I went to a craft swap at my library, and came home with 3 pieces of fabric -- one of them this teal poly knit that I had just enough of to make this snuggly tunic!

So I decided that this project could be made in a week, and got busy with it. There were previous reviews at PR, which was good as there are some sizing things to look out for with this pattern. It's clearly really oversize, intended for a fabric that can drape a bit. But the neckline and arms are quite closely fitted in comparison to the rest of the pattern. I usually cut a 14 or 16 at the shoulders and grade out to an 18 in many patterns, but in this one I just cut a Med (14/16) all through. There is a lot of ease in the body. 

I sewed up the under-sleeve seam with a 3/8" allowance rather than 5/8" -- this was suggested by a previous maker at PR, and I found that it worked perfectly. The sleeves fit closely but are not tight. And the rest of it falls from the shoulder, essentially. There are 2 large patch pockets, which are great, and proportionately right for this top. The only thing I may change is to shorten it by another inch or so -- I feel that I didn't get the short sewist measurements just right and it's a bit long. But I do kind of like that I can snug my knees up under it when I'm sitting and reading ;) 

I don't usually use polyester fabrics anymore, but this one was from a swap, and the colour and texture were just great. So I gave it a go. It's a bit staticky (poly...) but it is nice and cozy! Just those few sizing things to watch for if you make this one also. 

Thursday, August 11, 2022

Denim Look Vogue Dress

Now here's a dress that has been waiting its turn! I first planned to make this dress in thrifted fabric from a thrifted pattern way back in April of 2020. And I have proof that I cut it out in July of 2020 -- but then it sat on the project shelf until now. I thought that 2 years was plenty long enough for it to wait, so got it out and finished it up in August 2022. 

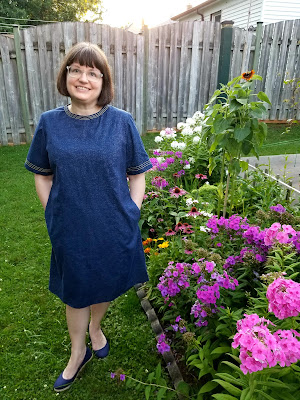
This was an affordable dress; both the pattern (Vogue 9166) and the fabric (denim look but very lightweight cotton) were thrifted. In fact, the most expensive part of this dress was probably the zipper, as I had to buy it full price since somehow I was out of navy zips! The topstitching thread is new but I did buy it in 2020...

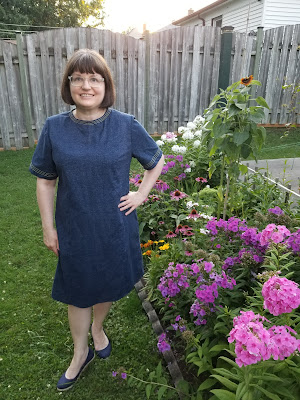
I was so eager to get pics in this nice evening light that I forgot I hadn't
pressed the back yet!! It looks better now that it's had an iron ;)

Anyhow, this is a simple fitted dress, with panel seams front and back, and the extra detail of a triple topstitched line at neck and sleeve. I guess that's what makes it Vogue ;) It had no pockets but of course I just used my favourite pocket pattern and added in some side seam pockets. I need functionality! 

The hardest part was getting the curved seams pressed nicely. I pressed them to one side, clipping at the curves to assist them in lying flat. The topstitching, being such a strong contrast, made me nervous, so I practiced a bit on some scraps (which I'd conveniently left with the cut out dress) to get them right before I started on the dress.


I ended up going with a 3.5 length stitch, and reduced the tension slightly. The sleeves went very well but I had some trouble with the start of the neckline rows; it was hard to get them straight with the lumpy zipper seam there as well. It took a lot of patience and some redoing to get it done to my satisfaction.


I'm quite happy with this project and even if it did have to wait two years to get finished, it now works well with my Blue & Yellow sewing plans of this year. This pattern was also fun to make since when I took it out of the envelope, it had been cut out with all my regular size grading already. 


The only thing I had to change was to shorten it an inch above the waist. I guess the original owner was my size doppelganger ;) I had cut it at 16 neck, bust and waist and graded out to 18 from just at the waist to the hip, which was pretty much what the pattern was prepped for. However, there was a shoulder pad allowance that also needed to be removed from the pattern so that it would fit the shoulder without the extra padding. I do think I will take it in a smidge at the bust-to-waist area though. 

Despite those changes and the anxiety of doing so much contrast topstitching, this was a fairly easy and enjoyable project to work on. Glad to have it off the UFO pile & into the closet! 


Tuesday, April 5, 2022

Cobalt Cropped Blazer: Vogue 8612


I've finished the first piece from my Spring sewing plans! This Vogue 8612 from 1993 was one I picked up at the thrift store specifically for the jacket. I doubt I'll make the jumpsuit, although the outfit as a whole is pretty cute! 


It's a particularly thrifty make: not only did I get the pattern at a thrift store but I picked up the wool gabardine via Our Social Fabric, an online thrift shop based in Vancouver. I didn't have quite enough blue fabric for the facings so used some black wool I'd picked up at a local thrift store. I was finally able to pair up a fabulous silky lining fabric I also found at Goodwill. I decided to use a covered button to finish it off -- also from a set from the thrift store! 


I enjoyed making this one a lot. I had to shorten the sleeves by 3" (short arms here!) and I shortened the body by 1", 1/2" above the bust and 1/2" below. If I make it again I won't shorten under, just above the bust point. The great thing about wool is that you can press out any bobbles pretty easily. Some steam and a bit of pressure (with press cloth) got those edges nice and tidy. 


Other changes I made: 

Added a 1/2" inch ease pleat to the centre back lining. While this jacket isn't super fitted, I do like to have that excess ease for movement in any jacket that I'll be working in.

I topstitched the edges rather than understitching the lining -- just couldn't see how I'd get a good line of understitching going after putting the shell and lining together. So used my favourite foot, the 1/4" quilting foot, to get a great 1/8" edge stitch. That is probably the most useful extra foot I've purchased. Great for edgestitching, topstitching and of course any random quilt piecing I might do. 


I finished the sleeve a little differently than the pattern called for, as I wanted a narrow hem. Just folded under 1/4" twice and stitched it down. When I move my arms you can get a little glimpse of the lining at the wrist which is pretty fun. 

And I think that's all! Sewing with this wool wasn't hard at all, and I love how I was able to shape the front seams smoothly with a bit of steam. I really love this combo of colours in this blazer and also am happy with my choice to use a matching button. Very pleased with this one. 


Sunday, December 5, 2021

Weekend Review: Sew Sustainably by Wendy Ward


How to Sew Sustainably / Wendy Ward
London : CICO Books, 2021.
160 p.

Carrying on from last week's book list of reading on sustainable sewing, here's a must read if you're interested in this topic! Wendy Ward has written a handful of other sewing books, all well done, and runs a pattern company as well (MIY Collection). She really has a specific style, and it's clearly on show in this book.

So this particular title is about using up all the smaller bits of fabric we all have left after sewing, as well as trying to reduce those leftovers through low waste cutting. There are no pattern sheets in this book; everything is done via measurement, like many zero waste patterns out there. And this book isn't limited to clothing ideas, either -- there are directions for art pieces too and accessories like bags and scarves too.


The cover image is a good example of the chapter on piecing; how to put together scraps into another appealing garment. (One that I really like here, shown on the back cover above -- lengthening a dress by inserting a strip of pieced fabric in coordinating colours. So cool!) This is definitely a great idea if this aesthetic matches yours. Some people will love it, others won't find it jumps on to their to-do list. There are a couple of designs for new or larger pieces of fabric, including a huge batwing style tunic/dress and a dropped crotch pair of pants. Like we're talking knee level or lower crotch. So it's definitely cool and unique, but not something I myself might make. But reading through the concepts does start to make you think a bit more about the fabrics you have and how to use them. 

I liked the idea of including fabric scrap art projects -- some were wall art, some notecards or pieces to applique to a garment. There were a couple of techniques shown, and this might be a way readers could experiment with scraps to see if they like the process and results. I think this kind of freeform scrap use is rather fun! 


As in all of her books there is a good strong section on basic techniques. If someone who doesn't really sew much or is just learning picks up this book, they'll have enough to get started right away. And there is also a section at the end of the book on refashioning and "aftercare" -- mending and caring for garments. 

Well planned out, great photographs, unusual projects -- if you like this scrappy, edgy aesthetic, you'll like this one. Even if you don't there are some interesting ideas and techniques shared, so I am glad I read it even if most of the projects are not for me personally. I think it would really appeal to a certain kind of sewist though -- if you know someone who likes to experiment and freeform their sewing and is also concerned with sustainability, this might be a hit. 


Tuesday, November 16, 2021

Burda Skirt in Magenta


Another brightly coloured piece to add to my bold and playful Fall sewing plans! I had this piece of magenta suiting from a thrift store trip, just enough to make a skirt. I chose Burda 127-09-2011 since I love a good slant pocket on a skirt, and because it fit my yardage! (as an aside: this nice pocketed pencil skirt pattern is hidden away in the magazine, only shown under a baggy long jacket with weird folds, it doesn't get highlighted at all in the issue. But it's a nice one!)

I also had this beautiful lining in my stash, just enough and a perfect match. So I got busy and cut this out. Then didn't work on it for nearly a month... But I've now completed it, and it was an easy sew that can be made much more quickly than I managed this time. Hey, I got distracted by other projects! 

I made a couple of minor changes to this skirt. I cut 42 at waist and 44 at hip, as I found my last Burda skirt quite large at the waist. I also made the waistband wider (cut two and stitched together rather than folding one in half for a narrow waistband) and interfaced it with a heavier duty interfacing to help keep its shape. 

Otherwise I pretty much followed the instructions. There is an underlap at the back waistband for a hook and eye, and the zip finishes at the bottom of the waistband, my preferred style. I also added the lining the same way that I did for my recent checkerboard skirt - even though it means a bit of extra hand sewing I feel that the neat finish is worth it. 

This skirt has a back slit, not a vent, so it's much quicker to finish. But I think I prefer a vent as it's less revealing. I am planning to make this skirt again so might adapt that when I cut out the next version. 


The only other change I made was to stitch down the inverted pleat by about an inch to keep it from poofing out too much. Now it sits a bit like a dart, smoother right at the front. I wasn't sure about the front pleats, but I think I like them now that it's done. 

This was a nice project, no big trouble with it and a nice fit too. The only issue I had is that this is hard to press and my hem is a  bit more rumply than I like. It's hand-stitched but I may have to unpick and stitch it to the lining to reduce the puckery effect. But now I need to get busy on the blouse I've planned in a matching dark floral so I can wear them together! So many projects I want to make... I'm sure you can relate. 

As worn today!