Showing posts with label sheath. Show all posts

Tuesday, September 24, 2024

Black & White Butterick 6655


My latest dress fits into my black & white neutrals palette of my fall wardrobe planning colour picks. And I'm glad that my latest round of planning hasn't changed much because I cut this dress out a year ago! And it only took me two evenings to sew it up. 

This is Butterick 6655, which I've made before, but this time I changed it up a bit. I cut the front on the fold rather than including the front seam, because I wasn't going to add in the faux button panel here. I just liked the way this pattern fit and wanted a basic sheath dress to wear. I also added in side seam pockets as I knew from my first one (where I didn't add pockets) that they would work with the fit this time.


My first one was made of a linen blend, but this time I was using a stretch bengaline, which is less familiar to me. The thing to note about this fabric is that the stretch goes lengthwise along the fabric, so you need to cut out on the crossgrain. But there is quite a bit of stretch so I thought it would be suited to a closer fitting dress, for a bit more comfort in wear. 

I used some white broadcloth for the pocket bags, as I thought self fabric would be too bulky. I was worried that there might be some show-through, but when I tested it I realized that the gabardine is quite thick and not transparent at all, even being white. So I didn't line the dress, I'll just use a slip when necessary. 


I didn't want it to be any shorter for this view, and probably should have cut it a bit longer - thanks, year ago me. So instead of turning up a hem, I used some white bias binding and made a 1/4" hem. I decided to hand stitch the hem since this fabric does ripple a bit when hemming - the sleeve required some steam to get the wobbly out. Hand stitching the bias facing down was easy and didn't take long, and it has a much cleaner visual finish. I'm pleased with this neutral - it will go nicely with a couple of bright blazers I picked up at the thrift store recently. And with lots of me-mades in my wardrobe too! 


Friday, October 7, 2022

Rush Hour Dress in Cobalt


I recently made a Rush Hour Dress with a special feature for the Liesl & Co Advisors Circle. The pattern includes both a sheath dress and a blouse with a distinctive asymmetric peplum. I decided to make the dress and create a detachable peplum for it to get more wear out of the pattern. 

 To find out all about how I made the peplum as a separate piece and made it wearable, check out the post on the Liesl & Co blog. I was amazed at how it changed the look of the dress, and really enjoyed the process of creating it. 

Today's post here, however, will talk a little more about the Rush Hour Dress itself. This was the first time I made this pattern, and I used a cobalt linen blend from my stash. The pattern is for a closely fitted sheath dress, with a bodice that includes princess seams and Dior darts. I knew from reading other reviews and from the look of the pattern that I was going to have to do some alterations. 

First off, I did my regular shortening steps; here I took up 3/4" above the waist and nearly 2" out of the skirt length (I took this out above the back walking slit and didn't change the length of that at all). I then measured up the bodice and ended up shortening the dart by 1/2" and then dropping the point by 1/2" as well. I think that worked out all right. 

To test everything I first made the lining - I used a poly lining for the skirt and some lightweight cotton for the bodice lining - I didn't want poly lining in the bodice. I love the colour contrast a lot; I was worried that it might peek out at the neckline, but made sure to press well and then understitch to keep the lining inside. It doesn't show at all but I know that the beautiful yellow contrast is there! 

When it got the the hemming stage I wasn't sure what I wanted. I didn't want a visible line of machine stitching 2" above the bottom of the dress, so I considered both a blind hem and hand stitching. Hand stitching made me think of using some seam binding as an edge finish to reduce the bulk, and when I was sorting through my shoebox full of thrifted seam bindings and bias tapes, I came across this one: it is an iron on hem binding. It has 2 strips of adhesive, and you just press it until they look clear on the right side. I tested this old packet on a scrap, and the adhesive was still good and didn't leave any marks on the fabric's right side. So I went for it! Another hidden yellow contrast :) 

The lining is then stitched down at the back slit, and it's lower than that hem edge level, so you won't see the flash of yellow when I'm walking. Again, just something that I know is there. It was really easy to apply and it's a great way to cover a fray-prone linen edge without the bulk of a turned edge. I'm going to have to see if they still make this product. 

Another change I made was to add some side seam pockets. I made the skirt slightly less fitted than the model image, so there was room to pop in some pockets. I can't wear a dress without them! I just used the same fabric again for the pocket bags and my favourite pocket template. 
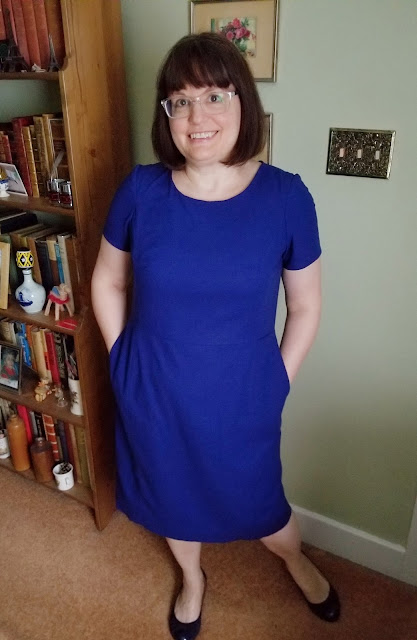
I'm really pleased with the fit of this dress, although I might take a pinch out of the back neckline if I make it again; it's just a little drafty near the back zip. Otherwise, I love the style and fit of this one, and the extra add-on peplum is just a bonus to extend the wear. It was a fun project to tackle and I'm happy with the results. 

Worn work style!


Tuesday, April 6, 2021

Floral for Spring in Butterick 6655

I've been slowly working away on this cheery spring dress for a couple of weeks, in between other things. I've had this floral linen-rayon blend for a while, and have had Butterick 6655 in mind for it. So I finally got moving on this plan!

I loved this pattern as soon as I saw it. I've been meaning to make it ever since it first came out. I like the button band element, it adds something extra to a basic sheath dress. It's actually a faux button band -- the flap is sewn into the front centre seam and buttons are stitched down through all layers at the end. I do love a good button so this one was calling my name.

The pattern is rated as easy, and it is. There are two long darts in front and two in back. There's also a centre seam both front and back, and you attach the button band into the front seam, and then topstitch to keep the seam allowance nice and flat. There's a neck facing and set in sleeves, and a back lapped zip. All good beginner basics to practice if you're just starting. The fitting would be the hardest part. It can be worn with or without the included fabric sash, I think either way works.


As for my fitting issues, I shortened it about 3/4" above the waist but didn't below, since it's pretty short for me as designed (for my tastes anyhow) and I am short! I actually added 2" to the short hem line marking on the pattern, when I cut it out. I graded out from 14 at neck to 16 at bust and 18 at hip. A frequent tweak I make with closer fitting items. And I shortened the length of the front darts by 1/2" at top and bottom to adjust for my figure better; the back darts only needed a smidge of shortening. 

As for design tweaks, I only made one big change -- I changed the back zip to an invisible zip. That's my preferred style, and I had a perfect lightweight invisible zip in moss green in my stash that matched nicely. The only thing I didn't change was the lack of pockets. I just didn't think I could get away with side seam pockets in the fitted shape. So I'll have to learn to live without pockets with this one, argh! 

Otherwise it was a straightforward sew with basic techniques. I really like the fit, and the neckline is high but sits well and doesn't choke at all. I love the fabric and am really happy with this project. I ended up harvesting the perfect buttons for it off of my yellow jumper I made last spring, as I'm planning on refashioning that anyhow. I think they work much better on this project! 

I'm happy to have something so cheery and bright to wear as the weather starts getting lighter and brighter as well. Happy Spring to everyone.