I recently made a Rush Hour Dress with a special feature for the Liesl & Co Advisors Circle. The pattern includes both a sheath dress and a blouse with a distinctive asymmetric peplum. I decided to make the dress and create a detachable peplum for it to get more wear out of the pattern.
To find out all about how I made the peplum as a separate piece and made it wearable, check out the post on the Liesl & Co blog. I was amazed at how it changed the look of the dress, and really enjoyed the process of creating it.


Today's post here, however, will talk a little more about the Rush Hour Dress itself. This was the first time I made this pattern, and I used a cobalt linen blend from my stash. The pattern is for a closely fitted sheath dress, with a bodice that includes princess seams and Dior darts. I knew from reading other reviews and from the look of the pattern that I was going to have to do some alterations.
First off, I did my regular shortening steps; here I took up 3/4" above the waist and nearly 2" out of the skirt length (I took this out above the back walking slit and didn't change the length of that at all). I then measured up the bodice and ended up shortening the dart by 1/2" and then dropping the point by 1/2" as well. I think that worked out all right.
To test everything I first made the lining - I used a poly lining for the skirt and some lightweight cotton for the bodice lining - I didn't want poly lining in the bodice. I love the colour contrast a lot; I was worried that it might peek out at the neckline, but made sure to press well and then understitch to keep the lining inside. It doesn't show at all but I know that the beautiful yellow contrast is there!

When it got the the hemming stage I wasn't sure what I wanted. I didn't want a visible line of machine stitching 2" above the bottom of the dress, so I considered both a blind hem and hand stitching. Hand stitching made me think of using some seam binding as an edge finish to reduce the bulk, and when I was sorting through my shoebox full of thrifted seam bindings and bias tapes, I came across this one: it is an iron on hem binding. It has 2 strips of adhesive, and you just press it until they look clear on the right side. I tested this old packet on a scrap, and the adhesive was still good and didn't leave any marks on the fabric's right side. So I went for it! Another hidden yellow contrast :)

The lining is then stitched down at the back slit, and it's lower than that hem edge level, so you won't see the flash of yellow when I'm walking. Again, just something that I know is there. It was really easy to apply and it's a great way to cover a fray-prone linen edge without the bulk of a turned edge. I'm going to have to see if they still make this product.

Another change I made was to add some side seam pockets. I made the skirt slightly less fitted than the model image, so there was room to pop in some pockets. I can't wear a dress without them! I just used the same fabric again for the pocket bags and my favourite pocket template.
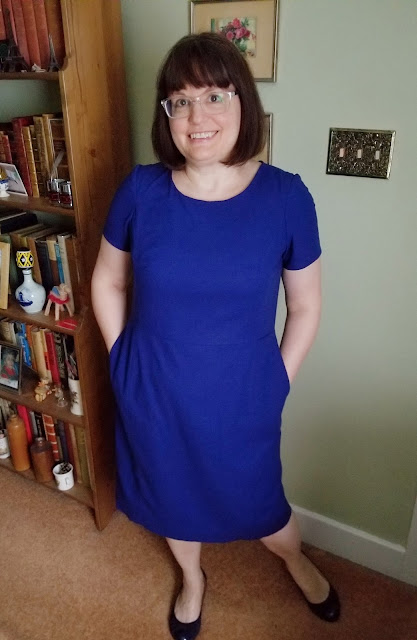
I'm really pleased with the fit of this dress, although I might take a pinch out of the back neckline if I make it again; it's just a little drafty near the back zip. Otherwise, I love the style and fit of this one, and the extra add-on peplum is just a bonus to extend the wear. It was a fun project to tackle and I'm happy with the results.
 |
| Worn work style! |


