Showing posts with label knit. Show all posts

Tuesday, November 28, 2023

20s Inspired Talulah for The Blue Castle


I had many ideas for my project for The Blue Castle round of the Literary Sewing Circle - many of the suggestions I made in our inspiration posts were things I was considering myself. But as I was rereading some passages in the book, I came across this image from when Valancy and Barney were going to town to be married, and I just couldn't get it out of my head: 

Everything seemed more dream-like than ever. Valancy didn't know whether she felt happy. Or terrified. Or just plain fool. 
Then the lights of Port Lawrence were about them. Valancy felt as if she were surrounded by the gleaming, hungry eyes of hundreds of great, stealthy panthers. 

To me this felt like a dark rainy night with lots of blurred coloured lights shining and reflecting, showing Valancy's confusion at the life changes she was experiencing. And I had a fabric that made me think of this exact image, too. 


I matched up this light poly-blend knit with a dress that has a 20s inspired silhouette, the Talulah by Style Arc. I've been meaning to make this for a while, in fact it was on my 2021 Make Nine list! So I thought the 20s inspiration together with the quote made for a perfect duo.

So now on to the pattern! I traced off a size 12, grading out to about a size 14 at the hip -- I added on about 1/2" to each seam line, and bumped out the sections to be gathered by the same amount so that I didn't skimp on the gathered panels, which are the highlight of the pattern. It worked out well! I also shortened the sleeves by 3", so that they are full length, ending at the wrist. I have short arms. 


The neckband went in nicely, although do note that it is quite a narrow width; if you are thinking of making a contrast band as a feature, you might want to increase the width a bit. I basted it in first to be sure it was the right size and then attached it properly. Easier than picking out a zigzag to begin with. 


I didn't shorten this one at all. I measured the line of gathering so that it would sit right at my lower hip (although the stretch in the fabric has made it sit just a touch lower in wearing) and then measured down to where I wanted it to end. I didn't need to make any adjustments. The pattern as designed is fairly short, ending above the knee but I wanted mine to sit right at the knee. I don't think this pattern would look right if it was longer than mid-knee, the proportions would be off, at least to me. But I left it and it's mid-knee for me as is. I have quite short legs, so if you are making this be sure to measure your pattern well before deciding what to adjust. 


I really, really like this one! There's a shaped centre back seam to give it a nice fit and it really adds to the pattern. I like the fit a lot - in fact I think if I cut it to a length just above the gathers, this pattern would make a nice basic tee as well. I like that it's close fitting but not clinging, and the little swish of the gathered panels is just perfect. The fabric is light but also substantial enough to hold the shape well, and I think the print is such fun. 


I'm happy to be able to think of this as my Valancy dress, and will definitely enjoy it. The only tiny flaw with it is that there are no pockets -- not easy to put into this silhouette. But I will overlook that this time as it is such a fun and comfy outfit!


\

Tuesday, October 3, 2023

Warm & Cozy Sewing for the Season


I was inspired to sew up a Warm & Cozy project for the fall, thanks to the PatternReview September contest of the same name. (And you can now vote for my project here, if you are a PR member!)

I had picked out a pattern that I wanted to make (Simplicity 2289, by Patty Reed) but hadn't found the right fabric in the stash. Then I went to a craft swap at my library, and came home with 3 pieces of fabric -- one of them this teal poly knit that I had just enough of to make this snuggly tunic!

So I decided that this project could be made in a week, and got busy with it. There were previous reviews at PR, which was good as there are some sizing things to look out for with this pattern. It's clearly really oversize, intended for a fabric that can drape a bit. But the neckline and arms are quite closely fitted in comparison to the rest of the pattern. I usually cut a 14 or 16 at the shoulders and grade out to an 18 in many patterns, but in this one I just cut a Med (14/16) all through. There is a lot of ease in the body. 

I sewed up the under-sleeve seam with a 3/8" allowance rather than 5/8" -- this was suggested by a previous maker at PR, and I found that it worked perfectly. The sleeves fit closely but are not tight. And the rest of it falls from the shoulder, essentially. There are 2 large patch pockets, which are great, and proportionately right for this top. The only thing I may change is to shorten it by another inch or so -- I feel that I didn't get the short sewist measurements just right and it's a bit long. But I do kind of like that I can snug my knees up under it when I'm sitting and reading ;) 

I don't usually use polyester fabrics anymore, but this one was from a swap, and the colour and texture were just great. So I gave it a go. It's a bit staticky (poly...) but it is nice and cozy! Just those few sizing things to watch for if you make this one also. 

Friday, September 4, 2020

Sointu in Blue


I was able to make a couple of items in August that I'd been planning on as part of this year's #20in20 challenge. One of them is the Sointu Top by Named Patterns.

I've owned this pattern for quite a while but finally got around to it when a friend gave me some fabrics, and one of them was this nylon blend knit, a vintage piece with original tag still on it. I loved the richness of the colour and the ribbed surface. It has very little stretch, so I thought this pattern might be a good fit for both the kind of fabric and the amount I had of it. I was able to just fit it all in.


One of the common issues with this top is the depth of the arm opening; I read a number of reviews mentioning this, so I ended up raising the underarm point by 2". This gives it a modesty that makes it a bit more wearable, but it does take away, just a little, from the loose vibe of the design.

In any case, it was a pretty easy sew! There's a front, back, sleeve band and belt. Plus belt loops and neck binding. The instructions go step by step and add in extra info, like to stabilize your shoulder seams, which beginners might not know about, so I think it is beginner friendly all around.

The changes I made, due to the fabric, were minimal. I didn't hem it, since this knit doesn't fray or curl at all. And instead of using a bias facing on the rounded V neckline, I just folded under and stitched -- something I very rarely do, but this is a sturdy knit and I was getting lazy. It worked out okay but I do have a couple of small puckers which annoys me. I may try to fix that.


The only moment of confusion I had was when I sewed the belt pieces together. It was enormously long, and I thought I'd mistakenly cut two instead of one. But then I realized that the belt is made to wrap around the body and tie in front. Once done that way it was exactly as it should have looked. Whew! Don't sew tired.


The belt is the key piece to this top, don't leave it off. I put on the finished top and was still unimpressed by the blah fit (huge and baggy), but then I tied the belt on and it changes everything. It gives shape and flair to the pattern. This is one that needs the belt for sure.

I'd like to try this is a different knit, and maybe also a woven, and see how that changes the look of it. Since it's an easy pattern and I like the end result, it seems like a good idea to try it again -- maybe next spring ;)


Friday, April 24, 2020

Retro La Brea Tee in Knit

Earlier this year I posted about the La Brea Tee top that I made from a silk woven. At that time I mentioned that I had attempted the knit version but it hadn't worked out. 


Since I have a lot more time now, I went back to it and tried to fix it up to make it wearable. It isn't quite there, but will do nicely as a top to exercise in or just wear around the house. The attempt to attach knit binding to the knit neckline isn't salvageable for real wear, unfortunately. But the rest of it is okay! I think a second try would work out now that I have more of a feel for this. 


The binding around the tee is so cute and retro, I have to try again to get it right. The colour choice is a bit startling, but that is because I'd begun this top for the PatternReview contest in which we were challenged to make something inspired by childhood, and these are the exact colours of my elementary school.


I like this pattern in both woven and knit! I like the details - the bias trim, the fit, the band at the bottom of the knit version. I made it a little looser fitting and longer than the original pattern images indicate, because I don't like form fitting clothing. I think I got the overall shape to my liking, even that bottom band, which I don't often appreciate in a pattern! Just have to choose the right fabrics and get the hang of tidy binding and I might get a wearable version out of it. 


Even the back looks okay to me. This pattern is really nicely drafted for a simple shape, and has those extra little details that add more interest to a tee. The finishing is lovely, the potential for lots of variety is definitely there. There are some sewalongs and hacking tutorials for this pattern on the designer's website, Halfmoon Atelier. I recommend you check it out if this pattern appeals to you.


I hope to have another, more successful version of this to show you soon. Do you ever find that you go back to rescue projects you've given up on? Or do you just get rid of the project and/or the pattern wholesale and go on to another?


Friday, December 13, 2019

Simplicity Sparkle Top


It was "Sparkle Day" at work today -- we are being a little more festive for the season. So I decided last night, even though I already had something to wear, that I'd whip up a new top anyhow.

I bought some stretchy pleated sparkle knit last year at my local fabric store; it's a very light, tissue weight and is medium stretchy. I bought it with a particular Burda pattern in mind, and even laid it out:


But I recently tried a McCalls pattern with a similar silhouette and it was a total fail. This capey drapy design does not work for my figure. So I changed my mind.


I went with the very simple Simplicity 8656 instead. While this is supposed to be a woven top, I knew I could easily adjust for this drapy knit. I shortened the body by cutting the neck & shoulder at a size small, then cut the sleeve length and under arm at Large, grading out to an XL by the hem. I did add 4 inches to the length as well. I had just enough fabric!


It's a super simple sew; the front and back are the same pattern piece. So I knew only a feature fabric would keep this from looking really dull. This is certainly flashy! There are certain problems with an identical front and back, even with an oversize boxy shape. I will need to cut the front piece with an inch pinched out of the neckline if I make this again - the back is fine, though I'd probably add a curved longer hem on the back next time as well. Still, for a quick and easy pattern, I really liked this one.


The fabric is very thin, as I noted, so I did have to experiment a little. I ended up using the smallest size of universal needle I had, and stitched slowly at a 2.4 stitch length. Shorter puckered and longer skipped. And I just turned under and stitched the neckline and sleeve hems, and left the bottom unhemmed, as the fabric does not fray or separate at all.


When I finished and put it on I thought it was okay, a little blah though. So I used remnant bits to sew together a narrow scarf to accessorize. I had two different bits, one lengthwise and one crosswise, so stitched them together even thought the crinkle goes two different ways. The seam is neatly hidden by the knot so it isn't even noticeable. The best thing about this is that I could use the black fringey selvage as the ends of the scarf! Once I added the scarf the top looked so much more intentional. I might still put some ruching in the sleeve seam to pull them up a little and give this top a little more design oomph. Another benefit of making the scarf is that I have very little scrap left over.


I am pleased with it and am wearing it quite happily for Sparkle Day. I even found my sparkly tights to wear with it. It is both lightweight and see-through so I am also wearing a tank top under it both for warmth and modesty ;) It's a fun project that might see another outing at New Years.


Friday, September 6, 2019

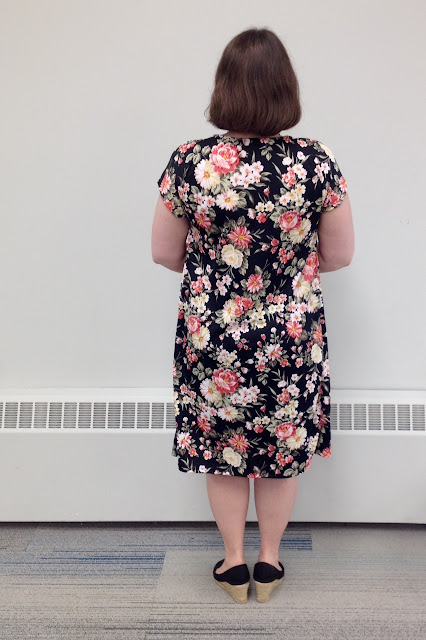
Floral TNT: Kwik Sew 3559


Sometimes you try out new patterns and muslin things and get frustrated at the changes and the difficulties you're having.... so you pull out a TNT as a refresher!

This floral dress was a quick sew made from my favourite knit pattern, Kwik Sew 3559. I've made it many times -- six times as a top and three times now as a dress. It's a simple pattern with nice lines and fits me really well. The only catch is no pockets. Though I add pockets to everything, I didn't to this one, mostly because my recent sewing streak was a series of fails, so wanted to be sure this would fit right first!


I did get it to fit properly, using my usual adjustments (cutting a M at the shoulders and bust and adding to each side by the hip level to make it just a touch larger than the L size line).  I pulled this pretty poly knit out of my thrifted stash, and was planning on making a tunic length, but fortunately had enough to make it dress length instead. And I have enough bits left to make up some pattern-matched patch pockets for the front that I'll be adding shortly.


I love this pattern for its easy fit and the shape. I like the little gathered front yoke and the way that the cut-on sleeve fits (although I did add an inch to the length of the basic sleeve on this version).

I've made in everything from a t-shirt weight jersey to this stable poly knit, and it works each time. Sometimes it is nice to make something that just works! One more piece from my stash used, as well -- I bought it because it was so pretty, so I am glad it's now out in the world.

Tuesday, November 13, 2018

Vogue 9329: My First Marcy Tilton


Here I am, finally, with a finished project! I made my first ever Marcy Tilton pattern, Vogue 9329, which is rated "easy". And it is. I chose this pattern as my latest project for the Fabricville bloggers network. Upon seeing this wonderful cotton lycra knit print in the Fabricville online shop, I knew I had to make something that would highlight the scribble print -- as a sewing librarian, I have a real weakness for any kind of alphabet/text based print. I have a few in my stash that haven't been used yet as well!

Since this recent Vogue pattern was a Marcy Tilton, which I've always been interested in, but it also isn't too wacky or out there in terms of construction or effect, which I've always been hesitant about, I went for it. The simple lines of the dress plus the cute swingy hem really appealed to me -- and that easy rating didn't hurt either, considering my recent sewjo levels.


I received the fabric and pattern very quickly, but was too busy to get going on it right away. After a couple of weeks I finally got the time to sit down and attack this project, and ended up making it all this weekend, from cutting to wearing.

And of course my photo location had to be the children's library stacks at work. Where else would I highlight such a literary print? Thanks again to cooperative coworkers who don't mind taking a few snaps on a break!


On to construction notes: this fabric is a medium weight cotton lycra knit - it has a great hand, not too thin and clingy, not too stiff and thick either. It holds the shape of this dress well but also swings with the pattern lines. It was also really easy to handle while sewing: I just used a medium-weight ballpoint needle and poly thread, as usual.

Even though it's a knit, it uses an interfaced (knit interfacing) neckline facing which is then topstitched at an inch below the neckline. This fabric just soaked up the navy thread I was using, and I really can't see any of the topstitching either at the neckline, sleeve bands or pockets unless I am looking very closely indeed. It is really a wonderful finish and my neckline sits much more smoothly than if I had used a knit neckband - I can never get those things right.


I made a large, which fit my lower half well, but was a bit baggy around the bust area. I took in an arc of 3/4" at the underarm, narrowing out to nothing halfway down the sleeve and just above the pocket. That was all I needed to get a snugger and more comfortable fit.

The pocket construction was really interesting, too, just one piece topstitched to the front piece and only sewn into the side seam of the back piece. I'm sure it's a common technique but I haven't done it before and really like it. The other interesting bit was the hem. Because it is a handkerchief like hem with side slits I was worried they might reveal a little too much of my very short legs, so I didn't shorten the skirt as I usually do with everything. I measured and the regular front hem would land just at the bottom of my kneecap so I left it, though the pattern design as shown on the cover is much shorter. The problem with being so short, though, (I'm barely 5'2") is that the length of my leg from hip to knee is quite small, and so side slits that might be nice on a person with a lot more leg can be a bit more revealing than I'm comfortable with since I have so few inches to play with! So if I do shorten this in future I may also reduce the side slit height just a little at the same time.


There are narrow sleeve bands and an offset side seam on the back which offer opportunities for print blocking, as shown in the cover images. This time I just used all one and love the fit and the comfort of this dress. But now I wonder how useful this pattern might be to use up some larger knit scraps in the stash! There could be ways to play with the neckline and pockets to print block a bit more as well.


In any case, I really enjoyed making this easy dress - it helped me get back into the swing of sewing and have a finished project to show for it. The quality of this fabric was a joy to work with, and as always, thanks to Fabricville for the chance to sew along for the blogger network.