Showing posts with label Style Patterns. Show all posts

Wednesday, April 26, 2023

1986 Blouse in Upcycled Rayon


This Style pattern was one I had on my wishlist to make at the beginning of this year. It all came together to convince me to make it now, as there is a blouse making challenge on IG, as well as the return of The Refashioners, AND a challenge to sew with some Viva Magenta. 


This was a perfect fit for all of that. It's a pattern from 1986 that I thrifted a while back. The price on the back for Canada is $6.75, which I think would have been a pricey pattern back in the mid-80s. And for such a simple design! The cover images look like there are some big shoulder pads in there, which I would have expected of a pattern of this vintage; however, there are none called for in the pattern. 


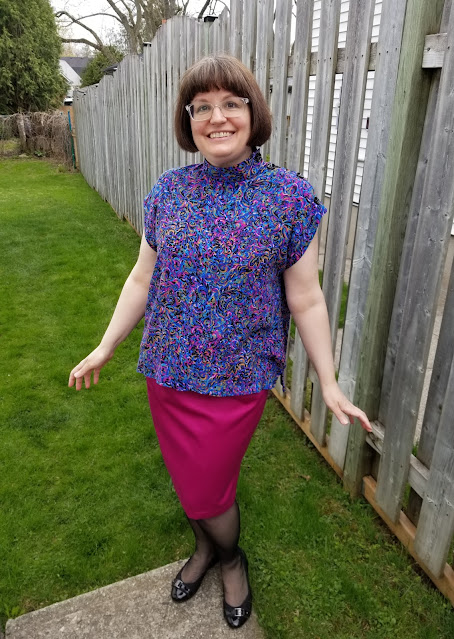
I used a half-made dress that I was given a few years ago. The rayon print is beautiful, and there are swirls of magenta in that print! I had first taken the bodice off and made a simple elastic waist skirt from this fabric but found I wasn't wearing it much in that form. And the print is too lovely to waste. Thankfully I had kept the bodice in my scrap bin, so I unpicked the skirt from the elastic and used that to cut the main body of the blouse. It was slightly too short on the left side of the pattern that had the button extension at the shoulder, so I ended up piecing a bit onto that side to get enough length. This print hides those extra seamlines well. 


I used part of the bodice to cut the collar pieces, and scraps from the skirt for the two small facings. There is still a little of the bodice left so I will reuse that in future! I dug through my button stash and finally decided on some plain black buttons that have a little extra with a white streak that runs through them. They were also from a big batch of random buttons given to me a few years ago. 


The blouse is a little shorter than designed (about 1/2") just because I had to fit it onto my skirt pieces. But I think it works. The front is fractionally shorter than the back but there are slits in the side seams so that's not an issue either! I cut a 14 at the neck and shoulder, and 16 the rest; however, I also added about 1/2" in width to the side seam, starting at the waist point and grading out to the hip. This shirt is basically a rectangle, so if I hadn't added that extra, it would have been too tight around my hip. 


I love this silhouette and may try one of the other views someday. The buttoned up one definitely caught my eye first, though, and I enjoyed making this simple, purely rectangular top that is a great piece for under a jacket. The original dress that I recut this from had some thin shoulder pads already covered in this fabric, so if I can find where I put them when I deconstructed this dress originally, I think I will add them in to give it just that touch more of the cover look!


Tuesday, March 2, 2021

1984 Style!

It's back to 1984 for me today -- the best year of the 80s -- all the best music was out, fashion was starting to really show the 80s aesthetic, and sewing patterns reflected some of that. I thrifted this c.1984 pattern a while ago, and it's been on my To-Make-List ever since. Style 4233 has a great silhouette, and I had just the right thrifted fabric to use for it!

This wasn't a very difficult project; the neckline was probably the most complicated bit, just trying to get the collar piece to wrap around to the back bodice correctly. Otherwise it's pretty simple, with the straightforward undarted skirt, and dolman sleeve bodice. 

The sleeve and the front neckline were what appealed to me most about the pattern when I saw it. The facing was a bit of a trick to get laying flat but a bit of clipping and pressing worked it out. The two buttons at the front opening are supposed to have rouleau loops to close them, but in my fray-prone wool blend there was no rouleau making happening. I instead used two black hair elastics; I cut off the metal closure on the small elastics and tacked them on so that the loop was the right size. It worked out great, much faster than the 40 minutes I spent searching through my button stash to find two matching black buttons that were the correct size and feel for this dress!

I made a small change in the pockets; in the pattern they are attached a few inches below the waist seam. I always find that putting the top of the pocket in the waist seam works much better for me -- with my short arms that placement is perfect, and also, catching the top of the pocket bag into the waist seam keeps the pockets in place, no shifting or flopping happening there. I also lined the skirt as I'll always be wearing tights with it, and the lining also gives a bit more body to the skirt. 

The only thing I really don't like about this pattern is that it uses a centred back zip. I don't know why I didn't change it to an invisible zip, which is always my preferred style, but I went with the pattern and am not very happy with the lumpy zipper insertion. I may still pick it out and replace it, but I couldn't face it after finishing the dress -- it's very hard to see the black stitches in the patterned wool fabric. Maybe I'll try it after I've had a break from the construction part of this dress for a few days! 

But I really like the 40s inspiration in this 80s pattern. perfect for the 2020s. I like where the waistline sits, and the collar/front neckline a lot. It's growing on me! 


Friday, January 31, 2020

Patterns, Patterns Everywhere!

I recently made my #20in2020 list, splitting into ten fabrics and ten patterns that I want to get to this year. But that of course left out the many other patterns I am keen to try! 

IF I were to add a list of ten more patterns to that challenge, there are at least ten of my thrifted 80s and 90s patterns that I would love to make this year. I am not adding them to an actual challenge, but I did think I'd share some of my favourites from my fairly large retro stash.


As I've mentioned already, I am really into jumpers lately! Here are two Simplicity patterns that both look really interesting -- Simplicity 9907 and Simplicity 9757. Both early 90s, but I think both are still workable. The 9907 even has the blouses included in the pattern.


What I am always most excited by are dress patterns. I love dresses. This 1984 McCalls 8960 says Fast Times at Ridgemont High to me -- the checkerboard print is spectacularly 80s. This could be a really fun make. The Simplicity 7668 from 1991 has a nice skirt option in this elasticated waist dress - and an interesting elastic waist jacket. 


Vogue 9166 is 90s elegance and has the simple detail of tripled topstitching at neckline and sleeve hems. I think this would look great in a beautiful linen. McCalls 3551 is oh so 80s -- All views are basically the same dress, except for the yellow View B which has a collar added. 


Style always has interesting design lines in their patterns. Style 4233 from 1984 is no exception - with a high neckline and dolman sleeves, plus the full skirt that I like better, this one is a bit of a fabric hog. But I think it's really cute. Simplicity 8346 is similar to the other 90s "Damon Dress Inc" pattern above, but also includes a woven cardigan pattern. I really like this one, both the dress and jacket.


And finally, another look in at something besides a dress... I have these two super cute patterns for separates. I've seen side buttoned skirts in both Big Four and Indie patterns this season, and remembered this Butterick 4716 from the late 80s in my stash. This has a nice shaped waistband, and I love the view with coloured tights. The McCalls 4042, also from the 80s, has a variety of top views, I think they are all pretty great. The purple short sleeved one would look good with the Butterick skirt, too! 

Do you like to collect old patterns? If so, what's your favourite one right now? Which one would you choose to make up right away?

Tuesday, August 6, 2019

Summer Sunshine in Gingham


I recently found this cheery yellow gingham seersucker at my local fabric store, and immediately thought of this vintage night dress pattern, Style 3734, which I found while thrifting a few months ago. Dotty has kindly agreed to model it for me. 


I chose the nightgown, view 2 -- the short one -- and quickly cut this out. It's very simple -- front, back and yoke. Even though the back has a centre back seam, I had enough fabric to just cut it on the fold and save myself any stripe matching agony. 


I also found some off-white vintage bias binding in my stash to finish off the sleeve edges. 


The hardest part was the yoke, mostly because it was a bit fiddly. Sew together the edges and one layer of shoulder seam, hand stitch the other side closed, and attach the body of the gown to the opening you've left in the bottom of the yoke.


The pattern also directed you to slip stitch the inside yoke down, but lazily I just pinned it carefully and stitched in the ditch on the front of the yoke to catch it. It's a night gown, I don't need a flawless finish! 


One change I did make was to cut the yoke on the bias to change the direction of the gingham, just because I thought it would look nice that way. I had to be extra careful not to stretch it while sewing, though, because of that. I think it worked alright.


Then I gave it a wide 1" hem, and decided to stitch two little buttons on the front yoke for aesthetic appeal, and also to help me find the front easily when putting it on, as it's pretty much identical either way.


This was a quick project but a perfect one for these steamy dog days of August. It's cheerful and cool, what more do you need for summer nights?


Thursday, August 23, 2018

A Literary Sewing Circle Project: A Storm at Sea, 1983 Style


Here, finally, at the last moment, is my own project for the Literary Sewing Circle!

I had intended to make a dress inspired by the imagery of Calamity's restored cashew grove, with this seemingly perfect green & yellow leafy fabric. But somehow I just wasn't feeling it! I couldn't get it going. I will have to try again later on.


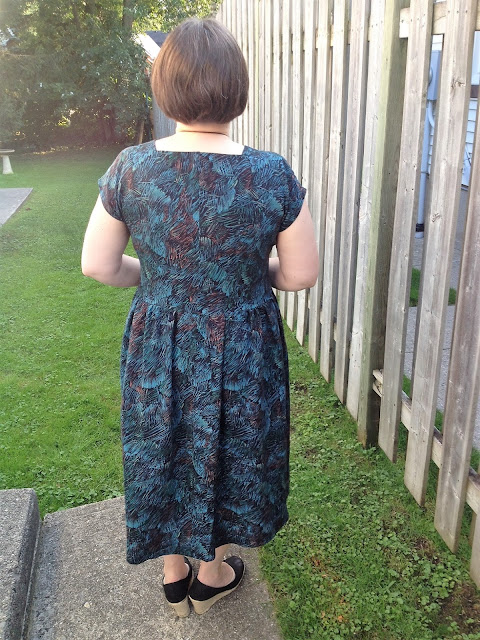
So I switched projects altogether -- I had this Style 4037, dated 1983, in my thrifted pattern stash, and I thought the loose flowy nature of it reflected Ifeoma's style.


 Plus I had the perfect vintage fabric in my stash as well, likely also from the 80s! It was given to me by a friend's mother, and when I look at it, it makes me think of the final chapters of The New Moon's Arms. In particular, the part in which  Calamity is taking Agway back out to sea, in the dark and the wind, and she falls into the water and is rescued and pushed back into the boat... this fabric makes me think of wind and rain and waves and maybe even a glimpse of seals in there somewhere... Thus, we have the Ifeoma influenced "Storm at Sea" dress!


It was a fun project, but I had some adjustments to make -- as it was an 80s pattern there was a lot of volume in it! Mostly in the skirt - though I don't know if the excessive fabric in the back skirt was intentional or a misprint of some kind: the back skirt piece (for half the back, with a centre back seam) was the same width as the entire front skirt. Since I didn't really want a bustle look going on, I folded out half the width down the middle of the back piece, as I didn't want to affect the side seams - one side was shaped a bit.


This seemed to do the trick. I cut a 14 (the biggest size in my thrifted pattern) rather than my usual 16, adding only 1/2" to each side seam at the waist. It fits quite nicely. There was a centre back zipper called for as well, but I think that the little bit extra helped, as I basted the back seam shut and tried it on and it fit over my head and waist just fine. So I omitted the zip. Which is always nice - not because they are that difficult, but because they are expensive! In this latest ridiculous round of international posturing and tariff setting, sewing notions are rising in price quite a lot, so saving myself the cost of one more zip is getting more important.


I cut it fairly long and decided not to hem it much as I liked the longer, fuller look (and it feels great to wear, the fabric hangs and swings so nicely). The patch pockets were another change - I only noticed after sewing them on to the front skirt that the pattern had them sitting over the side seam, half on the front & half on the back. But the drawing doesn't look like that, and anyhow, I don't need big saggy pockets on my hips. And they are big and droopy, very 80s vibe. When I put the finished dress on, though, I found I didn't quite like the amount of bag in them. So I pleated out the centre top of each pocket by an inch and stitched it down by hand, only about 2 inches down into the pocket. They're very deep so it's not very noticeable but it does keep the tops of the pockets from flopping out too much.


This was a pretty straightforward project other than the few adjustments I made to bring it up to my current tastes. . Now that I have a better sense of sizing I might make it again and keep the zipper in and make the waist more fitted to see how I like that. And I'd definitely make sure the gathered skirt wasn't gathered at the side seams - forgot all about leaving a little bit of smooth at the sides to improve the appearance of a gathered skirt. But I really love the front panel and squared neckline that results. You don't really notice the separate panel when it's all one print like this but the other views highlight it more.


In any case, I enjoyed making this, it is super comfy to wear (yay for 80s loose fits!) and I was even able to get a picture of myself with a big moon behind me to light up this Storm At Sea -- it's an amazing public art installation called The Museum of the Moon, hosted by Stratford Summer Music this week -- even better when it's lit up and glowing at night, and tons of events are happening around it. I'm just happy to have got this picture ;) 


If you've made something for this round of the Literary Sewing Circle, don't forget to post your link! Deadline is tomorrow! But if you make something later on, just add a note and link in the comments and I can share from there -- I hope you enjoyed your read if you were reading along, and that you've had fun thinking about the projects you could make even if you didn't finish anything this time.