Showing posts with label Liesl & Co.. Show all posts

Tuesday, October 10, 2023

Amarena: a new Liesl & Co pattern


I'm so glad I can finally share the last summer dress of the season! I made this Amarena Dress last month in anticipation of the new Fall release of Liesl & Co's patterns. I've been waiting impatiently to be able to share it :) 

Like many of Liesl & Co's dress patterns, this one is simple to make and wear -- the silhouette is a shift dress but there are also interesting details. I chose to make the short sleeved view, with the cute little shawl collar. There are also two pocket options, a welt pocket and a side seam pocket with a more unusual cutout front. I chose the side seam and I really love the effect. 

This cuff detail is also really cute! 

I used a crisp cotton from my stash -- I have had this for ages and finally found the right pattern for it. The dress has a centre front seam, but this print is random enough that pattern matching didn't worry me too much, and I think it worked out well. This is a pretty easy make, no closures to worry about. I really like the neckline with this collar feature. 

The alterations I made were just to sew up the neckline one inch higher than the original point, as I am short between shoulder and bust. This is something I alter often as I don't want V-necks too low! 

I calculated the length at just above the knee, where I'm comfortable, and am very happy with this cute shift dress. I think this is one I'd make again, especially because there is a long sleeve version that I could see making in a cozy wool or corduroy for fall/winter. 

For now I'm enjoying this bright and fun summer version!


Friday, August 4, 2023

Fancy Pants!


Yes, indeed, it's a rare day here at Following the Thread... I made some trousers! 

This is not something I do every day. In fact, I don't even do it every year. I so rarely wear pants that I don't focus much on making them and figuring out all the fiddly pants fitting. 

But Liesl & Co had the Cannes Trousers as part of their recent pattern release, and so I wanted to give them a try as part of the Advisor's Circle. They take almost 3 m. as drafted (although I knew I'd likely have to shorten them by a great deal) but magically, just the week I was thinking about making them, I found 3 m. of floral rayon at the thrift store. So off I went! 


You can see this project and the details over at the Liesl & Co blog now, but I'll also share a bit here. 

They were pretty straightforward in design and instructions; as usual, the instruction booklet has great illustrations and step by step explanations. Despite all that, I managed to put the fly zip in backwards even after holding the pieces up to me numerous times. Argh! But other than the fly going the wrong direction, it's otherwise perfect, it even has a nice fly shield.


The other major change I made to these pants was to shorten them significantly. I think I took 5" out of the length (I am barely 5'2") and have a 2" hem. That's pretty much what I'd expected. I'm not sure that pants this long and full suit my short figure that well, but maybe with a shorter and more fitted top the balance will be a little better. 

To check the crotch curve and rise, I took a well-fitting pair of linen pants that I've had for years (they've lasted because I probably wear them once a year) and laid the pattern against them. I found that I had to add about 1/2" to the back rise and a slight bit extra at the crotch extension to match but that the two were very close. I used this as my quick fit process and went ahead - the rayon only cost me $2.50 so I was treating this like my (hopefully) wearable muslin. 


As it turns out, it worked pretty well. I do find that these pants are still a little close to the body for my liking in the back, but still wearable. The pattern has lots of interesting details like the pockets and pleats, and I thought that it was easy to put together, other than my mirrored fly error. 

The rayon is very soft and feels great in these wide legs, especially when a breeze is blowing. I feel like these are very much 1930s beach pyjamas, and they're very Agatha Christie glam. Still not sure I'll wear them too often, but at least I now have a pair of summer trousers that actually fit me, so maybe pants will appear more often in my wardrobe. 


Tuesday, August 1, 2023

Linen Santa Rosa Top


I made another Santa Rosa! Actually, I made this top before the dress, to test out how the unfamiliar placket worked. You can also see this project on the Liesl & Co blog now, as well. 

Here I made the top view only, but it's very similar to my dress version, in that I left off the pockets, as I'm not a huge fan of breast pockets. The main difference with this (aside from length of course) is that I left the placket loose, no buttons at all. 


This linen blend is a stiffer fabric than called for in the pattern, so the interfaced placket is quite sturdy, in the sense that it will hold its shape and place - I don't have to worry about gaping and sagging with it. So it works out well just leaving it as is. It's not too low, and the way it sits means that unless you are doing some active moving about, it's not going to reveal anything.

I left the length of the top at the pattern lines, and quite like it. I was worried it might be too cropped for my tastes, but it really isn't. I have a higher waisted skirt in my closet (Butterick 5466) which is perfect, as it removes any concern that my midriff would show when I raise my arms. 

This top was such a quick and simple project. I really like the way the placket is constructed on the Santa Rosa, it made it easy to get a good result on the first try. And the standing collar is a little different and gives this top that extra flair that makes it a good addition to the wardrobe. Also, this fabric is a remnant that I've used in two previous projects, and is now mostly gone. It's also very light and cool for these summer days. A win all around! 

Thursday, June 8, 2023

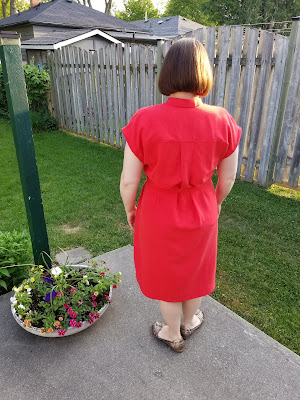
Liesl & Co. Santa Rosa


My latest project is one that I made as part of the Liesl & Co. Advisors Circle. You can see my full post about it over at their blog now! 


A few notes about it here for my readers, though. I combined the top and dress views for my outfit; I cut the dress length but used the cap sleeve of the top view. I also decided not to include the breast pockets from the top view. Instead, I added some side seam pockets, marking the waistline when cutting it out so that I could place the pockets correctly. To add these, I just used my favorite pocket template that I keep pinned up in my sewing room.

I made a couple of minor changes aside from these - I graded from 10 at the neckline to 14 at the hip, adding a tiny bit more across the hip area. I also changed the self-tying sash to a narrower D-Ring belt as I was using bronze toned buttons and had matching bronze D-Rings in the stash and thought it would look nice together! 

I can see switching the box pleat at the back yoke to an inverted pleat for another option, if you wanted the back to be less poofy at that point. Because I'm using a fabric with nice drape, it works very well, although I will always wear this with a belt, as the design intends. My height and shape means that the back is too voluminous for me without a belt. If I was a bit taller or the dress a bit shorter, it could be carried off loose, I think! 

In any case, I love this fabric and was so pleased to match it up with this pattern. It works really well, and is light and comfortable to wear. I was a bit worried when I started that the colour was a bit too orangey for me, but when it was all done it actually worked well and is more red than orangey against my skin so it works! It's a nice pattern with a very interesting placket construction so I'm keeping this one in the rota for potential duplicate makes. 


Wednesday, February 8, 2023

Yanaka Jacket in Scrappy Remnants

I've been wanting to make a Yanaka jacket for a while! I love the silhouette and the relaxed design; cropped or shorter jackets usually look best on me so I knew I'd have to make this one. I considered making a quilted jacket, but realized that a simpler print mixing version would suit me better. This project was made for the Liesl & Co. Ambassador Circle but was also inspired by the PatternReview Print Mixing Contest that ran in January (and if you're a PR Member, you can still pop over and vote for my jacket until Feb 10 if you'd like!) It will be shared on the Liesl & Co blog shortly as well!


This is an ideal pattern for print mixing or colour blocking, as there is a centre back seam, sleeve gussets and facings that can show if you fold the collar down. Lots of opportunity to use smaller pieces and show off those pretty leftover bits. And I have lots of pretty leftover bits! I use a lot of cottons and linens in my sewing so I got out my scrap bins and pulled out some of the larger remnants. I trialled a bunch of different combinations but finally decided on five floral prints that all fall within the same colour tones and scale. One of the prints (on the sleeve gusset) was just a cotton from my stash, but the other four prints werer remnants from other projects -- Butterick 6725, Butterick 6655 , the Itch to Stitch Celeste, and the Sew Different Harmon Top


I came up with a placement plan, but these fabrics were all fairly light/fluid. The Yanaka pattern recommends a medium to heavier weight fabric to support its shape, so I interfaced all the pieces with a medium weight fusible interfacing before starting construction. I knew that the standing collar, the front points and that wee back notch needed to be sharp, not floppy. Interfacing them prior to construction allowed me to use these particular scraps.


I didn't make many changes to the actual pattern. But there were a couple. I shortened the sleeves, actually by a little too much. In the end I didn't want to take any length out with a wide hem, so I made a 2" wide sleeve facing out of the cotton I used for the sleeve gussets (these were non-interfaced) and hemmed the sleeves that way. This also gave me a clear surface to stitch the lining on. I've added back some of the length to the sleeve pattern so I don't make this mistake again.


And I did also make a lining for this -- the jacket pattern is unlined, but with all my interfaced innards I wanted it all covered up nicely. Because of this I finished all my seams with a quick pass of the pinking shears since they'd end up invisible anyway.  I added in a 1/2" centre back pleat to give more movement room, and the lining was also a scrap!


The most notable change I DIDN'T make was that I did not shorten the body of the jacket at all. I almost always shorten above the waist but this time I liked the finished length and didn't want this to be too cropped, so left it as drafted. I really like how it turned out! It's really comfortable and the fit is great. I love the chance this pattern offered to use some of my beautiful print scraps to make a one-of-a-kind jacket. The lines of the design are just made for it!

Thursday, December 8, 2022

Garibaldi Skirt in vintage cotton

As mentioned previously on this blog, I'm one of the members of the Liesl & Co. Advisor's Circle this year. So, every now and then I take one of their patterns and make something with a bit of a twist to it. One of the new Fall patterns is an A-line skirt with 3 length options, a waistband or facing option, and some wonderful deep pockets, even with a side zip. It's called the Garibaldi Skirt, and it's my latest project! If you want to check out the original post on Liesl's blog, you can find that here.

So I decided to finally use a piece of fabric I've had for ages; my aunt gave it to me years ago (probably about 20 years!), found somewhere on one of her many travels. It's long and narrow, with this large print along one side. I knew I'd have to use it crossgrain to use the pattern but didn't have a clear vision for it. But this pattern suddenly made me remember this fabric and I knew it would be perfect.


The Garibaldi has no front or back seam to break up a print – the zipper is in the side seam. But unlike many skirts with a side zip, this one also has pockets, a must-have for me! The pattern pieces fit onto the print perfectly, with just a bit of care to get the pattern placement right. But because I am so short, I didn’t get much of the solid black at the top of the fabric. But the knee-length version was the one that suited me so I went with it.

I used a vintage invisible zip from my stash (the first one I’ve ever seen that has metal teeth!). This zip was only 9″ long, while the pattern calls for a 12-14″ one. To give myself more room, I installed the zip only on the skirt portion, not into the waistband as the pattern directs. I then stitched a large hook and eye onto the waistband portion. If I'd thought ahead a bit more, I might have added some overlap to the waistband and put a button in, but this works!

The other change I made was to add a lining. This fabric is a fairly lightweight cotton, and it sticks to itself very easily. I thought a lining would solve any issues with bunching as you walk and also add some body to the fabric. I used some basic black lining and just cut the front and back pieces of the skirt from the pattern. I sewed this on in my favorite way to line a skirt – I stitched the lining to the zipper opening, then flipped it inside and basted around the waistband. I then sewed the waistband on and hand-stitched down the inside of the waistband. It might take a little longer, but I really like the control I have when I do it this way, and the finish is very clean and neat.

I love the fit of the skirt. I didn’t have to adjust the pattern much once I’d chosen my size according to the pattern; sometimes, I find skirts hard to fit with my hip/waist ratio, but this was perfect. There are two small darts in the back for shaping and somehow it all worked for me. I love the waistband version (there is also a waist-facing option), and the pockets are just right, nice, and deep. I’m so pleased to have found the perfect pattern for this admittedly unusual fabric.


Tuesday, October 25, 2022

Cover Designs! #29: The Other Side of Midnight


Cover Designs is a feature in which I try to match up the outfit on a book cover with a dress pattern and sometimes even potential fabric matches as well. Today's pick is a suitable spooky read for the fall season -- and one by a favourite author of mine -- The Other Side of Midnight, by Simone St. James.

Summary from the publisher: 

London, 1925. Glamorous medium Gloria Sutter made her fortune helping the bereaved contact loved ones killed during the Great War. Now she's been murdered at one of her own séances, after leaving a message requesting the help of her former friend and sole rival, Ellie Winter.
 
Ellie doesn't contact the dead—at least, not anymore. She specializes in miraculously finding lost items. Still, she can't refuse the final request of the only other true psychic she has known. Now Ellie must delve into Gloria's secrets and plunge back into the world of hucksters, lowlifes, and fakes. Worse, she cannot shake the attentions of handsome James Hawley, a damaged war veteran who has dedicated himself to debunking psychics.
 
As Ellie and James uncover the sinister mysteries of Gloria's life and death, Ellie is tormented by nightmarish visions that herald the grisly murders of those in Gloria's circle. And as Ellie’s uneasy partnership with James turns dangerously intimate, an insidious evil force begins to undermine their quest for clues, a force determined to bury the truth, and whoever seeks to expose it...


This outfit can be replicated, and modernized, by using some quick and easy patterns! First off, to get that skirt, the Everyday Skirt by Liesl & Co would be a quick copy. Just add a bit of length so that it's below the knee, and this simple skirt with elastic back waistband and pockets is a match.


Liesl & Co Everyday Skirt


Then add a top to copy the lines of the cover image -- the Drop Sleeve Top by the Avid Seamstress is a great match, and it's free! Just sign up to her newsletter and you can download this quick woven top to make this outfit a close copy of the cover.

Avid Seamstress Drop Sleeve Top

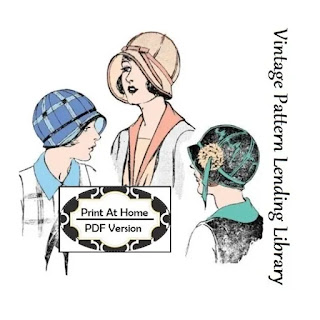
And of course, to top off the look you'll need a lovely 20s style hat -- you can find a few at Elsewhen Millinery on Etsy, or try this multiple view pattern by VintagePatternGirl to give yourself some choices. 

VintagePatternGirl's 1920's Cloche with Ribbon Trim

You can enjoy a spooky seasonal read and dress like the woman on the cover while you do it! 


Friday, October 7, 2022

Rush Hour Dress in Cobalt


I recently made a Rush Hour Dress with a special feature for the Liesl & Co Advisors Circle. The pattern includes both a sheath dress and a blouse with a distinctive asymmetric peplum. I decided to make the dress and create a detachable peplum for it to get more wear out of the pattern. 

 To find out all about how I made the peplum as a separate piece and made it wearable, check out the post on the Liesl & Co blog. I was amazed at how it changed the look of the dress, and really enjoyed the process of creating it. 

Today's post here, however, will talk a little more about the Rush Hour Dress itself. This was the first time I made this pattern, and I used a cobalt linen blend from my stash. The pattern is for a closely fitted sheath dress, with a bodice that includes princess seams and Dior darts. I knew from reading other reviews and from the look of the pattern that I was going to have to do some alterations. 

First off, I did my regular shortening steps; here I took up 3/4" above the waist and nearly 2" out of the skirt length (I took this out above the back walking slit and didn't change the length of that at all). I then measured up the bodice and ended up shortening the dart by 1/2" and then dropping the point by 1/2" as well. I think that worked out all right. 

To test everything I first made the lining - I used a poly lining for the skirt and some lightweight cotton for the bodice lining - I didn't want poly lining in the bodice. I love the colour contrast a lot; I was worried that it might peek out at the neckline, but made sure to press well and then understitch to keep the lining inside. It doesn't show at all but I know that the beautiful yellow contrast is there! 

When it got the the hemming stage I wasn't sure what I wanted. I didn't want a visible line of machine stitching 2" above the bottom of the dress, so I considered both a blind hem and hand stitching. Hand stitching made me think of using some seam binding as an edge finish to reduce the bulk, and when I was sorting through my shoebox full of thrifted seam bindings and bias tapes, I came across this one: it is an iron on hem binding. It has 2 strips of adhesive, and you just press it until they look clear on the right side. I tested this old packet on a scrap, and the adhesive was still good and didn't leave any marks on the fabric's right side. So I went for it! Another hidden yellow contrast :) 

The lining is then stitched down at the back slit, and it's lower than that hem edge level, so you won't see the flash of yellow when I'm walking. Again, just something that I know is there. It was really easy to apply and it's a great way to cover a fray-prone linen edge without the bulk of a turned edge. I'm going to have to see if they still make this product. 

Another change I made was to add some side seam pockets. I made the skirt slightly less fitted than the model image, so there was room to pop in some pockets. I can't wear a dress without them! I just used the same fabric again for the pocket bags and my favourite pocket template. 
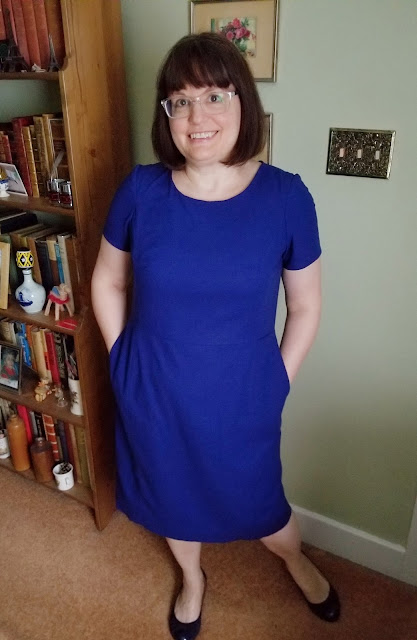
I'm really pleased with the fit of this dress, although I might take a pinch out of the back neckline if I make it again; it's just a little drafty near the back zip. Otherwise, I love the style and fit of this one, and the extra add-on peplum is just a bonus to extend the wear. It was a fun project to tackle and I'm happy with the results. 

Worn work style!