Showing posts with label Jalie. Show all posts

Tuesday, October 29, 2024

Jalie Bianca in silky patchwork

The second part of my Fall 2024 Fabricville Blogger project is this simple dress, made from this Satin Dimara Multicolour print. I ordered this print because I liked the visual mix; the listing said it was viscose, but unfortunately when I received it, I found that it is actually polyester, which I dislike and don't usually sew with. So I changed my pattern plans, choosing to go with something very simple with few seams - both to use the print effectively without too much matching across a seam, and to reduce the handling of this satiny fabric. 

I chose to use the Jalie Bianca, a pattern I've made before and really like. This time I altered it to have even fewer seams - I cut the front and back pieces on a fold so there are really only side seams to worry about. I made the view with sleeve cuffs, and also added in some side seam pockets. 

I also cut it to give more width in the hem, by simply sliding the skirt in from the fold about an inch, and extending that a-line shape a bit. I added 3 extra inches to the length in case I had to trim off at the end, which I did, so I was thankful for the excess. 

This is how much I had to even up the hem after hanging- widening
it did mean it was more on the bias than the original as well

I found cutting the toughest part of this - this fabric was so slippery! I thought I had it perfectly balanced but the print is a little slanted, just enough to annoy me, lol. Other than keeping it from sliding around it wasn't a bad sew. I had to use a new, fine needle to keep from snagging anything, and did have to let the dress hang overnight to let the hem settle, then level it before stitching, which was a finicky job! 

So it was a bit fussy for such a simple dress but I think it's really fun in its finished form, anyhow. I like it, and just hope it won't be too staticky to wear - I think it will go under quite a few jackets.

Maybe not the original plan of my cream corduroy jacket, which is a great pattern from Vogue, but turned out much too big for me. But I have lots of other sweaters and jackets which will match with one of the many colours in this print. 


Tuesday, May 10, 2022

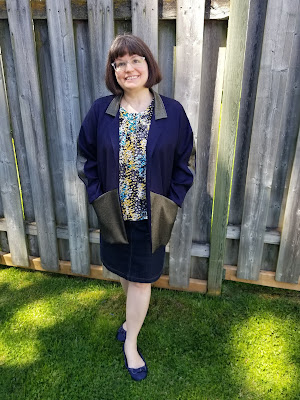
My Kyiv Jacket: Jalie Tania in blue and gold

Well, I made it to Round 3 of the Pattern Review Sewing Bee! This is farthest I've ever gone in this challenge, and I'm enjoying it so far. The challenge set was to make the Jalie Tania coatigan, and make it your own. I've made the Tania previously, so didn't have to do much fitting or tracing, which was a definite benefit as the week-long sewing challenge fell on a week in which I was very busy and short of time. 

I ran a number of ideas through as possibilities, until I finally decided on making a lightweight coatigan from some navy and black wool challis in my stash. I was taking Kyiv as my inspiration: it is sometimes known as the City of the Golden Domes, and so instead of the bright yellow and blue of the Ukrainian flag, I went with navy and gold in a nod to both. 

I cut my navy wool, and the gold lining I had in mind. I was planning on doing some embroidery and/or stencilling in gold, but when I was making samples I just couldn't get it right. It all looked too "homemade" and not what I was going for. So I decided to make a change.


 I knew I had some gold-toned fabrics in my stash so got them all out and changed the lower part of the Tania. I decided on some bronzey stretch fabric so had to interface it with lightweight interfacing to keep it from stretching out. Matching up those "V"s meant some fussy hand basting to begin with, something I experienced on my last go-round when I was matching up piping points. This bronzey gold seemed to go nicely with both the navy and the more golden lining. 


But I still didn't think it was enough, it needed a little more design. So I made the interior of the collar also in bronze, to highlight it when the collar is turned down. And more importantly, I decided to make a slashed sleeve, both to show off more gold and as a tribute to the church domes that were my inspiration - the oldest churches in Kyiv were built in 1037 and kept getting added to up to the 1850s and beyond, so that stretch of years includes the European fashion of slashed sleeves and doublets somewhere in there ;) 


 I used a strip of 2.5" wide gold fabric, attached to the sleeve which was split down the middle (it's a symmetrical sleeve) with a 1/4" seam, and then folded back together with edges touching. It's stitched down by about 3" at top and bottom, while the middle is left to open and reveal the gold insert. 

This wasn't too hard to make -- the pattern is quite straightforward. I didn't have many fitting adjustments to make, both because I am a fan of the boxy shape, and because I've made it before. But all the additions and changes did mean I had to start over a bit and think about how to put it all together most efficiently. 

While I don't think this was really out-of-the-box or terribly unique (no real changes to style lines or overall appearance) I enjoyed making it. I was pleased with my inspiration, and was also happy to have been able to once again make the entire project out of stash materials. I knew that gold lining would have a perfect project some day!


Tuesday, September 28, 2021

Jalie Rachel Top in Black and White


This is another black and white top for my Fall Neutrals collection ;) I used the Rachel pattern by Jalie, which I've had for a while and been planning on making for all that time. Other reviews of this pattern are right; it's so quick and easy to sew up, and has a neat construction process. 


I used a heavier knit from my stash which has been there a long time, as I don't usually buy poly fabric anymore. And I had a bit less than 1.5 m., don't know why I had this small bit but it was perfect for the Rachel. 


I cut my usual Jalie size W/X. This works well in the short top but if I was making the dress version, I'd want to add more width to the bottom so would probably cut W/Y for anything going over my hips. I think if I used a lighter weight fabric the fit over the belly area would be too tight for my own comfort as well, so definitely look at the measurements of the hemline width before you cut. 


The hardest part of this project was laying it out. My table isn't wide enough to accommodate a full piece of fabric laid out flat, so it took some finagling to get the large front piece of the pattern pinned down smoothly. After that it was clear sailing. I chose the sleeveless, short tie top view (fabric constraints necessitated it). The front piece has an odd shape, with the tie attachment seam resulting in a strange angle and big cutouts. It goes together ingeniously and the ties can just be looped over one another at the end to give a nice visual finish. 

Because my fabric was heavier and pretty stable, I just followed the turn under and stitch instructions for neckline, armhole and hem. I'd either use knit stabilizer for a lighter fabric, or use one of the other options included in the pattern, a knit neckband or a turtleneck collar. 

With 3 variations on the tie band and two sleeve options, plus the neckline variations, you could make a number of these without repeating yourself. It's a very quick and easy sew, with a great result. It's one of the only Jalie patterns only available in PDF because of the large and unusual shape of the front piece, but it's worth it. Definitely recommend!


Tuesday, October 13, 2020

A New Fave: Florence!


Part Two of my current Fabricville Blogger project is another Jalie pattern -- this time the Florence Blouse & Dress. I chose to make the blouse length, as this was intended as part of an outfit along with my Fall-worthy Bianca, in the jumper configuration! 


I absolutely love this pattern! After much searching, I chose this black and white cotton (ANGELA cotton print - Stokes - White) from the Fabricville site; it has a bit more body than intended for the Florence, but it's still a fairly thin and malleable cotton -- it's slightly translucent, too: if you look closely you can see the print through the pockets. But it's certainly not a problem. 


I cut Size Y, although I'm size X by measurement -- it's a slight difference but I was really going for the boxy oversize look here. Once I received this fabric I realized that it had an 80s vibe that I hadn't really caught online. So I went with it and increased the oversize effect. I love the collar too. 


I found the perfect buttons for it at my local Fabricland, and got busy on this last week. It's an easy pattern and didn't take much adjustment or fancy sewing! I enjoyed making this one. The plackets are folded over, the collar has an interesting method of attachment, the opposite of what I'm used to, but easy. I also really like the low, curved back yoke and pleat. Because of this extra ease, you don't need to grade between sizes even if you usually do, there's plenty of room as drafted. I'd usually do an X/Y or even a W/Y blend on some Jalies but this one was perfect as it was. 

The only change I made to this was the hem. It called for a 2" hem, but I didn't lengthen this at all, and liked it the way it was prior to hemming. So I just did a narrow 1/4" pressed hem instead. It's the perfect length for my tastes now.

I absolutely love this as a standalone blouse.

And open as a fun, lightweight overshirt. 

And of course as I'd pictured it, under the Bianca as a paired outfit. The only catch here is that the armhole of the Bianca could be 1/2" lower and the Florence a smidge higher to work together optimally, but I'm not complaining. I love them both and adore this black and white print, and the purple corduroy, both available at Fabricville online.

I didn't expect to find such a perfect match of fabric and pattern with this top; but together it's an all 80s hit weekend! I love the fit, the construction, the aesthetic -- everything about this. Another one is definitely in the cards. 

Tuesday, October 6, 2020

Bianca in Fall

This is Part One of my current Fabricville Blogger Project; I chose to make the Jalie Bianca (a pattern I've been eyeing for a while now) in a rich Eggplant Feather Wale Corduroy, thinking that it would work nicely as a fall dress and also as a jumper!

The fabric is soft and malleable -- but as it's corduroy there is really no drape so I chose to make the straight shift view without sleeve bands. It's perfect as a straight jumper style dress, with no closures to worry about, and the best patch pockets! Huge and attached into the side seams as well as being topstitched. 

This pattern has no closures, but both front and back are cut in two, with a centre seam. If my corduroy had a bigger wale so that the stripes were more noticeable, I might have cut the two front pieces on alternating grainlines so that one was vertical and one horizontal. I think the play of light and texture on the two would be interesting! But since this fabric is very fine, I just went with one direction for the whole dress, the nap facing down. 

This is a great pattern, as expected from Jalie. Because I was making it in a non-suggested fabric, I did make a couple of changes, however. The original pattern has a back neck facing and a front bias facing. The facings are attached prior to sewing the shoulder seams. 


But, since I wanted to fully line this dress/jumper, I chose to use bias facing all around the neck so that I could sew the shoulder seams of both dress and lining and baste together at the neckline before attaching the bias facing. I could have just sewn the lining in as the finish, but I prefer lining to sit under a facing at the neckline, because I feel like otherwise a bit of the lining always rolls out no matter how carefully I understitch it. That's just me; you could definitely finish the neckline with the lining if you're less worried about that than I am! 

I also finished the sleeve edges by basting the lining and dress together and attaching the bias arm facings as well. It's a nice tidy finish, and fortunately I had a lovely winey-purple bemberg lining left over in my stash that worked perfectly. I decided to stitch the lining down into the hem like I have for the last two jumpers I've made, because that holds it all together neatly and there's no twisting around with the heavier fabric and tights when the two layers are firmly attached. 

When I finish Part Two of this project, it will add to possibilities of this Bianca!


Tuesday, October 1, 2019

Tania Coatigan in Cursive


My latest Fabricville blogger project was a bit of an outlier for me. But I was making it for the latest edition of the Fabricville newsletter, and the theme was Fall jackets.

I don't often make outerwear or even blazers, but I was looking for a fall jacket/sweater, and the first thing I thought of was the new Tania Coatigan by Jalie. This jacket-like cardigan without front closures is perfect to throw on over a dress to look instantly chic and keep yourself warm in the chillier days or nights of fall! It has the addition of angled seams and clever pockets for that extra appeal.


The recommended fabrics for this pattern are stable knits or linen; it gives different looks depending on the fabric you choose, from casual to dressy. The pattern also recommends that you use your high bust measurement for a fitted look, and your bust for a looser fit. This opens up so many options!

I’m a librarian and I love sewing with unexpected fabrics, so I really couldn’t resist this cotton drapery fabric - PK Studio Cursive Caps - from Fabricville for my choice for the Tania! Look at those beautiful cursive letters – I can’t wait to wear this to work.


Although not one of the recommended fabrics, it is fairly lightweight without any special coatings or treatments that can sometimes be found on upholstery fabrics. Thinking about the characteristics of the fabric, the drape, the weight, scale of the print, and so on, is vital when deciding to use an unusual fabric choice for any pattern. Think about the lines of the pattern and whether the fabric you’ve chosen will match with that. For example, this fabric wouldn’t work for anything full or gathered, but it works amazingly for something fitted, with structure.

These back seams are perfectly straight when this is hanging on a hanger; there is slightly
too much fabric in the upper back for my body & so they curve out when worn. Sigh.

I made very few alterations to the Tania. Jalie’s patterns are always very well drafted. Because I’m only 5’2”, I did shorten it slightly above the angled seams, and shortened the sleeve length by a couple of inches. I also increased the bicep of the sleeve by 1.5” because my fabric doesn’t have much give and I often find Jalie sleeves narrow for my body normally anyhow.


I made a few cosmetic changes too: to accent those angled seams I inserted some satin piping that I also found in the upholstery department! It took a little extra time and hand basting to ensure that the points matched up at the seams but it was worth it. Because this drapery fabric tends to fray easily, I also took the time to bind all the seams with seam binding tape. This was the lengthiest part of the process! So much pinning and careful sewing. And I finished the edges of my facing with some bias binding for a tidy and attractive edge.


Other than those changes, this was a quick sew, perfect for the enthusiastic beginner on up. This pattern has potential for many different versions. When I make it again, I’ll probably use a knit, and one change I’ll make is to make the body one size smaller for a snugger fit. After wearing for a bit, I find that there is a lot of volume in the lower back for my body so will just take it in a little at the centre back seam to adjust for that too. A great pattern and a wonderful, high quality fabric with a print that I love make this into a hit for me!


Tuesday, January 15, 2019

Jalie Yoko in Green Stripes

I downloaded the Jalie Yoko as soon as it was posted -- what a great shape! I have been looking for a boxy style top for a while now and this was just perfect.


Also perfect was the mossy green lightweight sweater knit I picked up at Fabricland in a sale just a day or two previously. It was so very soft I couldn't leave it behind. Luckily it has just enough stretch in it to be able to get away with using it for this pattern.

It's a simple design, and Jalie's drafting is so good, that I cut it without too much concern. I wondered if I'd got my sleeve shortening alterations right, as the drop shoulder threw me off a little - but as it turned out it is perfect. I love the way it drapes on the body and the shape and fit are just what I was looking for. Because I'm short I didn't alter the length - I wanted it to end at the bottom of my hip so didn't have to change anything.


I don't have a serger, so I sewed this way I usually sew knits, with a narrow zigzag stitch - 3 long & 1.5 wide. Jalie's instructions gave a different method but I didn't try it out so can't say how effective it might be (though of course, with Jalie being the experts in sewing stretch fabrics I'm sure there woul be no problems).  I wonder how this would turn out in a different fabric -- because it was so simple and I really, really like the result of this attempt, I may just try again.

Really if you haven't tried any Jalie patterns before, download this free pattern and give it a go. I think you might be pleasantly surprised.