Showing posts with label Fabricville Blogger Project. Show all posts

Tuesday, October 29, 2024

Jalie Bianca in silky patchwork

The second part of my Fall 2024 Fabricville Blogger project is this simple dress, made from this Satin Dimara Multicolour print. I ordered this print because I liked the visual mix; the listing said it was viscose, but unfortunately when I received it, I found that it is actually polyester, which I dislike and don't usually sew with. So I changed my pattern plans, choosing to go with something very simple with few seams - both to use the print effectively without too much matching across a seam, and to reduce the handling of this satiny fabric. 

I chose to use the Jalie Bianca, a pattern I've made before and really like. This time I altered it to have even fewer seams - I cut the front and back pieces on a fold so there are really only side seams to worry about. I made the view with sleeve cuffs, and also added in some side seam pockets. 

I also cut it to give more width in the hem, by simply sliding the skirt in from the fold about an inch, and extending that a-line shape a bit. I added 3 extra inches to the length in case I had to trim off at the end, which I did, so I was thankful for the excess. 

This is how much I had to even up the hem after hanging- widening
it did mean it was more on the bias than the original as well

I found cutting the toughest part of this - this fabric was so slippery! I thought I had it perfectly balanced but the print is a little slanted, just enough to annoy me, lol. Other than keeping it from sliding around it wasn't a bad sew. I had to use a new, fine needle to keep from snagging anything, and did have to let the dress hang overnight to let the hem settle, then level it before stitching, which was a finicky job! 

So it was a bit fussy for such a simple dress but I think it's really fun in its finished form, anyhow. I like it, and just hope it won't be too staticky to wear - I think it will go under quite a few jackets.

Maybe not the original plan of my cream corduroy jacket, which is a great pattern from Vogue, but turned out much too big for me. But I have lots of other sweaters and jackets which will match with one of the many colours in this print. 


Tuesday, October 15, 2024

Vogue 2053: Jacket in Cream Corduroy

For my latest Fabricville blogger project, I decided to make a dress and a jacket -- well, I've only finished the jacket thus far but do have the dress on the cutting table now! 

This Vogue 2053 was enticing, I pictured it in this lovely cream corduroy from the latest offerings at Fabricville.com. The fabric is indeed very nice, but this project was SO HARD. This boxy jacket was more complicated than it appeared at first glance. It has paneled front and sides, full length sleeves with a working vent, and is fully lined.

This wasn't too awkward until I got to the lining the sleeve part. Oh my goodness. It took me almost an hour of fiddling before I figured out how to stitch the sleeve hems and vent extension together inside out and then flip it so that it sat correctly with no holes! My brain was tired. Something I discovered was that none of my tailoring books had any instructions on this specific part of the process, and I couldn't find anything online that showed me what the Vogue instructions were trying to tell me to do. Finally I just tried a few things, unpicked a few things, and finally got it right. Whew! 

The other difficulty with this project is in the fabric itself. It's a beautiful cotton corduroy, but it does shed terribly when working with it. And pressing is another issue: I had to be very careful and press gently on a folded towel so that I wouldn't crush the wales. But it's hard to get it perfectly crisp when you can't just squash it down. I used a lot of steam and time and it mostly worked, but it does wrinkle up again fairly quickly. Especially in the sleeve where there is a lot of bulk. 

I took about 3.5" out of the sleeve length but I think I could stand to take one more inch if I try again. And if I did try again, I wouldn't bother about the working vent, I would just make a shorter simple sleeve ending. As it is, I didn't bother putting buttonholes in the vent, I just stitched the buttons right through both layers. The sleeve is boxy and doesn't need a working vent. 

Close up of the sleeve vent - kind of looks 
like my face when I finally finished it!

One thing I decided at the beginning was that I didn't want to use the corduroy for the facings. I felt that would be too bulky, and it could also cause the jacket to stick to the clothing underneath if it was at all grippy. So I auditioned a few fabrics in my stash, but ended up going with a pale linen in my upcycle pile - it was an old pair of summer pants that I didn't like wearing but were made of a lovely linen. It was perfect for the facings and I like the contrast on the inside. I used an 'oyster' lining from Fabricville for the rest of the lining, and found some very cool brass buttons there too. 

I learned quite a lot making this, and also made quite a few errors. I feel that I could size down a bit but it is way too late now to make any adjustments; I'm kind of tired of the project ;) Things I learned for next time - use a more pressable fabric, size down a bit, and don't bother with the sleeve vents. I think if I changed those trouble points, this would be a fairly quick project on a second go. As it is, after all the effort, I'm fairly pleased with how it looks, but am also not 100% convinced that this boxy style is right for me. I'll try it styled a few ways and see how it goes. It might go right into someone else's closet -- or not, depending! 


Tuesday, April 9, 2024

Butterick 6727: My Fabricville "House Dress"


For my latest Fabricville blogger project I've made myself a classic House Dress...well, maybe I'm stretching it a bit. I've made a faux wrap dress from Butterick 6727, in a fun cotton print covered in colourful houses. It makes me think of  Bergen or St. John's or Kyiv

This was a pretty simple project but it took a bit of time thanks to the special details. I made View B, with piping trim and a below knee length. The dress is a faux wrap, with the crossover bodice and skirt both sewn shut together at the waistline seam and then tacked down by the buttons along the front. Which are also faux -- they are stitched on through all layers at the very end, the closure is actually an invisible zip in the back. Although if you really wanted to you could eliminate the back zip and make real buttonholes in the front, as the crossovers are quite deep and all faced. I don't think you'd run the risk of flashing anyone with this pattern any way you chose to make it. 


The only slightly more difficult part was attaching the waist seam. This was because you have to be careful that the two piping ends on the bodice and skirt line up properly so it's a continuous line from neck to hem, and because there are a lot of layers there while you're doing it. With the crossovers on the bodice and the skirt both basted down, along with their facings, you are essentially stitching through 6-8 layers of fabric at one point. So don't choose a thick or heavy fabric for this one! My cotton is very lightweight and crisp, and I used lightweight interfacing, so it worked very nicely. 

This sewed up quickly once I got going. The only alteration I made was to shorten both the bodice and the skirt by 1" each.  I cut a 14 at neck, 16 at bust, and 18 at waist to make easy size adjustments for my figure, which usually works quite well. But, I find there is a bit of extra height in the shoulder area, which I could have taken in a bit so I might add some 1/4" shoulder pads to fill out that space later on. Otherwise, this was an easy sew, with a nice cotton that behaved beautifully. I really like the piping detail and feel secure in this faux wrap, which I never do in an actual wrap dress! My first dress of the season, to appear shortly on the Fabricville blog as well!


Tuesday, November 7, 2023

A Batwing Burda, for Fabricville and beyond


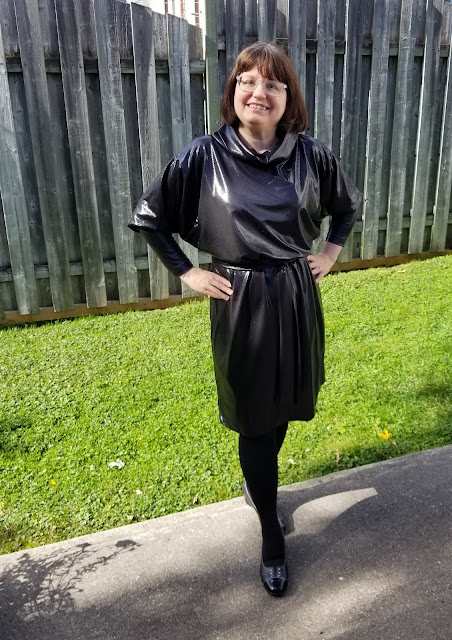
My second project for Fabricville this fall was a shimmery black batwing dress. I love a good 80s influence, and when I saw Burda 6074, I knew I had to make it.


For my Fabricville version, I used “Dazzling Black” evening fabric, a poly knit with printed sequins. A print is so much easier to sew than real sequins! In fact, this fabric was very easy to handle. It’s lightweight with fairly minimal stretch, and it behaved nicely when sewing. I used a stretch needle, though, as this fabric was both thin and tough at the same time. It worked really well, where a regular ballpoint needle was just not working out. 


The Burda pattern is a quick and easy sew, as promised on the pattern envelope. There are 5 pieces; front & back, sleeve, collar & self-tie. Because this fabric is so lightweight, I interfaced half the collar with some light knit interfacing. You won’t need that if you have more heft in your fabric, or if you’d prefer it to be more squishy and cowl-like, as designed.


I only changed the pattern slightly, shortening it by 1/2″ above the waist and adding the 1/2″ back at the hem. I wanted my version to be knee-length so I didn’t shorten it at all (I am only barely 5’2″).  I made my usual Burda sizing of 42 at the shoulder and 44 at the hip, although I also added a bit extra at the hip when cutting it out, probably 1/4″ on each side. I also shortened the sleeves by an inch. 


I enjoyed sewing this up, but when I put it on, well, I did feel it reminded me quite strongly of a Hefty trash bag! The combo of fabric and pattern perhaps wasn't the best here, even though both on their own are pretty great. 


So I decided to make another version, this time is a lighter weight knit from my stash. I got this green and black soft knit at Fabricland locally, quite a few years ago. I had just enough to make this dress. (the pattern calls for 3 m. but I found I could fit it into 2.5 m. quite easily). 


I made all the same sizing adjustments, as I found my first version fit very well. But this is where fabric makes such a difference! I found the cuff area of the sleeve on the black version quite tight, so I added 1/2" to the diameter on the green one. But the green fabric has a lot more stretch than the black, so I find it is now a little too large! I'm going to narrow it back down to the original sizing.


I also added pockets to my green version -- I didn't think the thin and shiny black fabric of the original could handle pockets, but this thicker and squishier knit worked just fine. I placed the tops of the pockets just below the match points for the sleeve (which basically sit at the waist). This seems just right, and it's very convenient to have pockets! 


I love the silhouette of this pattern, especially the sleeve. The 80s vibe is strong, and it's also a very comfy outfit to wear. I think it looks quite different in the two fabrics, and enjoyed that it's also a quick sew. 


Tuesday, September 26, 2023

BarbieCore Butterick 6889

My latest project for the Fabricville blog is just squeaking in to the end of summer dress season. But when I saw this combo I knew I had to try it! The pattern, 6889, is a Retro Butterick 50s release, I've had my eye on it for a while and decided to try it now. There were a few interesting fabric choices in the latest Fabricville options, but when I saw this pink printed cotton I suddenly felt that I absolutely needed to make a BarbieCore vintage inspired dress. 

This is a quilting cotton so doesn't have as much flow as the fabrics that are recommended for this pattern, but I thought I'd give it a go anyway. I do think it turned out well, but in a lighter fabric, the gathers at the waist will fall more lightly that they do in my version. 


I made a few adjustments -- mainly in length, as usual for someone who is barely 5'2"! I found that the bodice of this pattern is quite long, and I ended up taking about 1.25" out above the waist, so that the ties would fall on my waist. I didn't want a lot of blousing, as the pattern image shows that it's pretty sleek. I did end up with some blousing, however, and do find that there is a lot of ease in the bodice, even though I cut it according to my measurements. The neckline fits very well, however, and isn't too constricting, which is something I thought about while cutting this out. I also took about an inch out of the skirt length, and used a 1.5" hem as well. 


The other small alteration I made was to add in a side pocket on the right side (opposite the buttons). I always need a pocket! I think you could add patch pockets as another option, as they would fit quite well into the retro aesthetic. But I just added a side seam pocket, using one of my standard templates. 


I used the required 1/2" shoulder pads as per the pattern, as I felt that they would finish the look, although I didn't cover them with fabric, which was an option, with pattern pieces for that purpose included in the pattern. And I'm quite pleased with the pretty shell buttons that I found at Fabricville to finish this one off! 


As to the pattern itself, I wouldn't recommend this for a beginner. There is a lot of hand sewing to get things secured, and there is also the line of buttons on the side. I do find that I can put it on over my head without undoing any buttons though, so to simplify this project you could easily add buttons to the side band without making any actual buttonholes. The instructions are a bit vague in places; I found them difficult to decipher in the stage of putting the side button bands on (yes, there was unpicking...) I felt like the instructions could have been a bit more expansive, even though the dress itself was fairly simple overall.

So this dress took a little longer to put together than I'd planned but in the end I am happy with my Barbie influenced dress! It's a bit different from my usual style, especially with the close fitting neckline, but it's always fun to try something new.  


Tuesday, March 28, 2023

Floral Set for Fabricville


My latest project for the Fabricville blog is a little different for me - instead of a dress, I made a two piece matching outfit! Now I have separates that I can wear together for the dress feeling, or break apart to wear in other combos. 

I saw this floral rayon online at Fabricville, but the online image was a bit deceiving -- it looked like it was all floral stripes, but when I received it, the stripes ran along either selvedge edge with the centre more of an open floral. If I would have looked more closely at all the images, I could have seen this ahead of time - but I didn't.  Fortunately the print and colours are very cohesive, but it did mean that I had to make some decisions about how to lay out my pattern and how to use the print effectively. I didn't want the wide band of stripes running horizontally at the bottom of the blouse so I held the fabric up to me and asked for some opinions and finally decided that the stripes would run vertically down the right side of the outfit. I usually tend to put decorative elements on the left so it surprised me that this just looked better to have the stripe feature on the right! 

This is a rayon voile, and it's very lightweight and shifty. It is super soft and smooth, and the colours are so wonderful bright and deep against the dark navy background. But it was tricky to cut since it is so slippery and light. I got it cut fairly well, but I am glad that the busy print hides any mild mismatches! 

The blouse, Butterick 6731, was not a complicated project. And I only made a few minor changes. I shortened the body by 1/2", but did not shorten the sleeves at all. I raised the point of the V-neck as I thought it would fall a little low on me, and I'm glad I did. I also narrowed the centre of the neckline and the centre back by 1/4" each. The biggest changes were with the back darts - I found them extremely long so pinned them in to test it out, as I did not think this fabric would appreciate any stitch unpicking. I ended up shortening the upper point by one inch and raising the lower points by 4 inches - I wanted to leave more room across my butt ;)  I then shifted the dart centre to just under halfway between, a touch closer to the lower point. That pulled in the excess across my back but left lots of movement across the hips. Because of this, I also omitted the side zip. I basted the side seam and tried it on to see if it would go on without a zip and it was very easy to do as long as I had the front ties untied. All in all, it took some fiddling but I really love it. It fits nicely and is a super soft and comfortable fabric to wear. 

I added a lightly gathered skirt, using a pattern from my stash, Simplicity 1542 (a pattern I actually bought for the jackets). I thought this skirt had the right shape to go with the blouse. I had to alter this as well; first to add some length to it (3.5") and secondly, recutting the waistband as it is designed to sit 1.5" below the natural waist. I prefer my skirts at my natural waist so altered it to fit at that spot rather than below.

I added a side seam pocket to the right side of the skirt as well - the left has the zip so I didn't bother fussing around with that. I'm right handed so the right pocket is the main one I use anyhow! I was grumbling about the wobbliness of the fabric while cutting and sewing, but I love how it turned out and think this will be a very wearable set.