Showing posts with label Burda magazine. Show all posts

Friday, December 6, 2024

Basic Black with Burda

November brought a new contest challenge over at PatternReview, the Mini Wardrobe challenge, in which you were to make 5 coordinating items in 5 weeks. I was thinking about it for a while, and realized it would be very unlikely for me to make that many things in such a short time frame. However, I did put together some fun ideas, the initial one being the Merchant & Mills Factory top that I just shared. The whole concept was built from that piece. 

I thought of making a red blouse, a cream sweater or jacket, and a black skirt to go with it, and maybe a fun print dress. Of course I just finished the top, but now have completed the black skirt. The other projects will have to have their turn another day ;) 

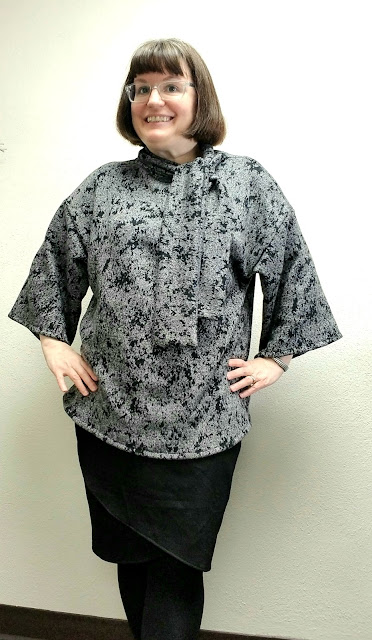
But I am very pleased with the black skirt that I chose for this outfit. I had just enough black twill left from another project to make a new Burda pattern - I used #117 from the Dec 2022 issue. This skirt has everything I like - slash pockets, a waistband that sits at the natural waist, and a lining. I was able to make the whole skirt from fabric from my stash, which was an added bonus. I realized after I'd cut the waistband that I added seam allowance to it, as with all the other pattern pieces - but the waistband is a rectangle that already includes S.A. so I had an extra wide and long piece. But this worked out in my favour! 

The front of the skirt has two pleats on each side, just before the pocket openings. This is quite nice. I did find the pocket bags a little shallow and will extend them if I make this again; I like to be sure my keys aren't going to fall out. 

The zip closure is at centre back, and is supposed to be a 9" invisible zip that goes up to the top of the waistband. I find that messy sometimes, though, so I used the 8" zip that I had and inserted in only in the skirt piece. 

This is where the excess waistband came into play. Because my waistband had extra length, I was then able to create a 2" underlap on the left side, and add a skirt hook and eye. I prefer this closure over trying to force a zip up past a bulky seam. Plus I like to add the waistband after the skirt and lining are sewn/basted together, as I find it's a much neater finish, for me. It worked out perfectly but I do find in wearing that the back is a little tight and so I have wrinkles - should have added another inch to the back width. Still wearable though, especially if I iron it before taking pictures ;) 

I also lengthened it by 2" but because there is a slight A-line shape to it, I didn't have to add a walking slit to the back (the shorter length wouldn't need it so there wasn't one in the pattern). I actually love this skirt a lot and would definitely make iy again. I love the way it fits (slightly higher waisted to work with shorter tops like my Factory top) and the pocket/pleat combo sits really nicely on the body, no puffy bulges to worry about ;) I can always use a basic black skirt, and this pattern might just be my new winner. It's comfortable, pretty easy to sew, and I like the details. Very happy with it. 


Thursday, September 12, 2024

A Real Green Dress, with Burda May 2023


I feel so thrilled by the fact that I have actually made something else on my 2024 MakeNine list! And I even used the fabric I had intended for this pattern :) I cut this Burda 115 from the May 2023 issue from a linen blend that's a bit heavier than I'd recalled. 


This fabric, from the sale table at Fabricland, was just okay -- when I washed it and laid it out, I realized had a few discoloured areas where an almost shadowy bluer dye was splotchy on the surface. Thankfully I was able to cut around most of these bits, but it did mean I used more fabric than technically required, and oh boy does it crease quickly. Lots of pressing ahead!

But the colour, when clear, is wonderful & I really enjoyed making this. The front tucks were what first caught my eye about this pattern & I had fun with that detail. I have been wanting to add some extra elements to some of my projects, and these tucks convinced me to try this pattern. 


There are also integrated pockets in the side panels, which are nice. Pay attention to the pattern pieces when you are cutting this out though, to be sure to connect the pocket bags to the body and cut together, or you'll have to add an extra seam.

I cut it at my usual Burda size of 42/44 but think I could have done 44 all through. It's much closer fitting at the shoulders and bust than the cover image on the magazine makes it seem -- I think the model may be wearing a size larger than her measurements might call for. Or maybe it's just my fabric choice.

Overall I feel like this was a good project, and I'm happy with the results. I don't like how to darts are fitting - they are not pressing firmly and giving a weird crease. But other than wanting to fix up the darts a bit I do like this one. When I adjust the darts I think I'll like it even more! 


Tuesday, April 23, 2024

Burda Knot Front top

PatternReview is running an upcycling contest this month, and that gave me the push to try a project I've been thinking of for a while. I received quite a bit of fabric, including a few finished projects, from a friend a year or two ago. One item was a gorgeous blue shift dress in a linen/cotton or rayon blend, I think - anyhow it's beautiful. I tried just fiddling with it a bit to see if I could make it fit me but it never worked. The neckline & shoulders were just too big, and the hip area too small. 

So I took the plunge and cut it up! I laid out a few simple tops but found that this Burda top (109-08-2021) worked best with the available fabric. Plus it has this very cute knot feature at the neckline, which I have wanted to try for a while now!

I cut everything out except for the armhole facings; I ran out of enough fabric to cut these longish pieces. I could have pieced the remaining bits and probably had enough, but didn't want a bunch of seams on the arm facings, might be uncomfortable. I looked through my stash of vintage bias binding and found one pack of a perfect blue. So the armholes are finished with binding instead!

Another change I made was to cut the back piece across the existing back seam of the dress. There is a back neck slit in the pattern but I sewed together the neck facing and tested it to see if I could get it over my head without unpicking the back piece to get an opening. It fit very easily. So I didn't put it the back slit. I always hate that fiddly button loop anyhow, haha. 


I cut this in my usual Burda size, 42 at the neck and 44 at the hip. There is not much leftover scrap fabric from this one, and I'm so pleased that I can wear this glorious fabric now. It will be a great piece for summer days! 


Tuesday, February 6, 2024

Burda Swing Top in leafy print

The Make a Garment a Month Group on Instagram had a January challenge -- "Jungle January". I really wanted to make something as I had two excellent fabric choices in my stash. After some waffling, I decided to reuse a pattern for a swing top from Burdastyle magazine which I've made before (Burda 115-11-2018). I had just enough fabric for this easy top. 

My fabric is a light and stretchy knit, so I used straight stitches on the shoulders to try to keep them from stretching out too much. There is supposed to be a bit more gathering on the shoulder seams but I found that the weight of the shoulder seam has reduced the effect a bit. I'm thinking of going back in and stitching a small piece of elastic to the shoulder seam to regather and hold the gathers too! 


Otherwise this was a quick and fun make. I'm used to the pattern now, with all my adjustments (mainly adding 3" to the hem length) even if it does look a little different in each fabric I've used. I love the bright green (more vibrant in real life) and the rayon knit is super soft to wear. 


This is a fun silhouette and I do love an oversized top with a straight skirt. I'm wearing my staple knit skirt, the free Lindy Skirt from Itch to Stitch (with added pockets) which I wear constantly. Burda does have some fun designs and I'm glad I saw the IG sewalong to give me a bit of a boost to make this top. I got it done on the last day of January, so just squeaked in to the sewalong, but would definitely would not have finished without a deadline! Do you enjoy contests/sewalongs/challenges? I often find them stressful, but in this case, I had something in my long-term queue that fit into the challenge and this gave me enough of a kick to get going on it. I'm finding I like these deadlines more and more ;) 

Anyhow off to swish around in my flowy new top! 


Tuesday, January 2, 2024

Hot Pink Burda Blouse


I had a lovely holiday, lots of reading, sewing, eating and visiting. And now I'm back with my first post of 2024! I thought I would share the blouse that I finished just before the end of the year, so that I can share my roundup of favourites of 2023 later this week -- this blouse will be a part of that :)

I thrifted some hot pink cotton (maybe a linen blend?) at my local thrift in 2022, and had been intending to use it for a blouse all year. I hadn't gotten around to it, though, until PatternReview's December Fitted Blouse contest rolled around. I thought it was the perfect time to finally make it! (and you can go on over to PR if you're a member and vote for me there now, until the 10th,  if you are so inclined!) 

I cut it out in early December but got distracted by Christmas sewing, so really got to sewing it up after Christmas Day. I used a pattern I've made before, Burda 105 from the April 2018 issue. I liked my first one and thought that the unusual darts and design of the blouse would show nicely in this solid fabric.

Of course, in the solid I had to be a lot more careful to have everything lined up so that the dart ends and waist seam would be even across the middle. That was the only really fiddly part. 

Sewing with solids is not my usual habit, so I had to add some print in! I used the scraps from my summer Barbiecore dress for the inner yoke and collar band; it was the perfect pink match. I was going to use some high contrast black buttons, but I discovered an amazing match in my stash. I had purchased some half-pink buttons of the right size in the bargain bin at Fabricland a month or two ago. I really needed another card to have enough and thought it was pretty unlikely to find any more in the random sale bin so much later. But I headed down to the the store to check, and like magic, found two more cards after sifting through the bin a while. It was meant to be! 

This one isn't very difficult, but it does take some time. Lots of little bits to get right. I really like the darts in the front, but also the narrow yoke in the back which adds shaping and some width to the back as well. I also really like the two piece sleeve, with the lower section more gathered. I didn't adjust the body very much but I had to take 3" off the sleeve length, split between the two sections. 

There is quite a bit of topstitching, on the collar, cuffs and button band, so I was glad to have my quarter inch foot to keep my stitching straight. I edgestitched all those areas, preferring a narrower line than a 1/4" topstitch. The foot really makes it so much easier.

I love how the colour of this really jumps out at you in natural light. The shape is great, the fit is very nice, and I just love the whole thing. It's the bright pink blouse of my dreams! 

I'll be sharing some of my other 2023 favourites shortly, and some more New Year kind of thoughts as well. Hope your holidays were restful and that you are ready to face 2024. 


Tuesday, March 7, 2023

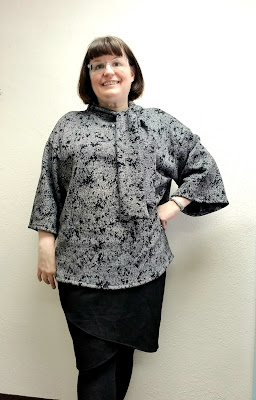
Burda Sweater in Black

It's funny how I never think about making basics, but when I saw this Burda sweater (#102) in the Sept '22 issue I immediately pictured it in black, as an elevated basic.


I love the tie feature on the neckline, and wanted a pullover basic black top to wear with my coloured and patterned skirts. So this one became a project on my mind, to complete before the weather warms up! This week was chilly, so good incentive to finally get this underway.

I had this really nice sweater knit in my stash -- it's medium weight, and quite stable, perfect for a comfy squishy sweater. It was easy to cut and sew; it took pressing well despite its poly content, and ended up being a very easy and quick project, just what I needed. It reads as more silvery than black but I can always make another ;)

I made a few changes to suit my style preferences. The pattern has full length sleeves that are quite wide, but I don't like a lot of fabric at my wrists, so I shortened the sleeve to 3/4 length. And then I added length to the body of the sweater, as I didn't like the waist/high hip length of the original. So I've changed the proportions of the sweater quite a bit but kept the bell sleeve shape and most importantly, the tie neckline. 

I sewed this up using a narrow zigzag on my regular machine (I don't have a serger). This sweater knit is super forgiving anyhow, and you can't see the stitches at all (more reason to be careful so I didn't have to try to unpick any stitches!) The neckline feature was actually very easy to put together, you just have to remember to carefully mark the notches on the neckline and the tie so that they go together easily. 

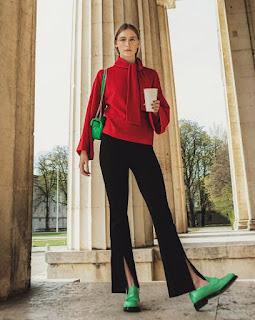
The sizing is generous on this one. I made it in my regular 42 but it is roomy, so if you want a closer fitting sweater more like the magazine photo I would recommend going down a size. Personally this loose fitting shape is just what I was looking for. And that neckline finish adds some fun to the design as well as keeping the back of your neck warm too! Love this comfy top. 


Friday, June 10, 2022

Blue & Yellow Sewing Plan: Burda 143-04-1990

Another dress complete in my blue & yellow sewing plan! This one was a bit of an outlier -- I found this fabric in my stash after making my plans so added it to the pile, as it fit in just right. 

I had Burda 143 from one of my magazines  (April 1990) on the original plan, matched up with a solid yellow linen blend, but decided to test it out on this busy print first. It was perfect. 

I made some sizing adjustments, as the dress only came in two sizes (older Burda mags don't have the full nested sizing). I traced this in a 44, which is okay for me as I'm a 42/44 in Burda. I simply cut the bodice without any seam allowance, and that brings it down to a 42 (with 1/2" seams). I did shorten the bodice by one inch, but will take up another half inch if I make it again to get it just right. I also added a 1/2" wedge of seam allowance at the bottom side seam of the bodice so that it would match up with the skirt, though, and so that the waistline would be the right size. 


The skirt I cut as a 44 with 1/2" seam allowance all around. After measuring, I decided to add 2" at the hem to give myself room to decide on hem depth. I didn't think 1" would be enough, and I was right. As it is, I ended up hemming it only 3/4", so will add in 1.5" of length to the pattern so that I don't forget I added so much if I make it again!

But other than those sizing decisions, this was a quick and easy sew. I really love the skirt; it has slash pockets, my fave kind, and has a tulip shape. The back slit is just the allowances on each side pressed under and topstitched, with the neck facing, hem and sleeve hems all topstitched as well. It's quite cute. If this was a solid with contrast topstitching it would be a nice feature -- although I'd have to be more careful with the topstitching in that case ;)

I really like the fit of this one so think I may make it again - that yellow linen blend is still a great choice for another version. But I have so many patterns I want to try I'm not sure how soon I'll get to a second one!


Tuesday, April 26, 2022

Burda Book Jacket

Well, I was fortunate enough to move on to the second round of the PatternReview Sewing Bee this year, and was also fortunate that I had the week off so I could work on my new assignment! I'm glad I did because it was a tough one. The brief was to create a garment in which the buttonholes were the feature -- not the buttons, but the buttonholes. Yikes! I was stumped at first.

I thought about it all the first day and came up with tons of different ideas, that were all rejected almost immediately. I researched various buttonhole techniques and ideas, and when I watched a Threads video on shaped buttonholes I was hit with the idea of making a "Book Jacket" - perfect for this librarian! It would feature open book shaped buttonholes. Once I had that thought I couldn't get rid of it, so spent most of the next day looking through my jacket & blazer patterns for a clean silhouette with buttons all the way up the front. Harder than you might think. 

But Burda came through for me again; I found the perfect pattern, 108 from 12/2021. It's a boxy style, and also had a coat variation (109). This was helpful because the collar on 109 had a wider gap at centre front, which I thought I'd need to accommodate my elaborate front buttonhole feature which required an extended placket to fit them on while keeping them centred on the centre front line. So I traced mostly 108, but 109's collar.

There are only 3 buttonholes, but laid out against the plain black jacket I think they stand out as the main feature. This is after all my Book Jacket, so my faced buttonholes shaped as an open book had to be the focus. To avoid disrupting the effect, I used the same text fabric for self-covered buttons (one of my favourite kind of buttons). While buttonholes for a jacket like this are usually horizontal, I had to switch mine to vertical to fit the book theme - the spine of the book becomes the buttonhole.


I made the buttonhole feature using a paper template I drew out, and was very careful to line the centres up with the centre front line. I don't always do a lot of thread tracing to mark centre front and button placement marks on a pattern, but I did here. On my samples I tried stitching the 'lips' to the facing to make a clean edged window, but I preferred the look of the topstitched window, as I felt it emphasized the book outline a little more. So that's what I did on the jacket. I put the buttonholes in on the right front pattern piece before I did anything else at all, in case I needed to recut the front and try again ;) Fortunately I didn't, so went ahead with construction.

I also decided to add in a little sleeve gusset at the wrist as a way to bring in the text fabric somewhere else in the garment. It's a little detail that shows when I'm moving.

I find the jacket comfortable and like it both done up and open -- I wasn't intending to ever wear it open, but the book effect still works when it's not buttoned up, and the counter effect of seeing the buttons separately actually adds to it, I think. I'm happy with the contrast between the black background and the book shaped buttonholes and text fabric. I enjoyed learning the shaped buttonhole technique and now have lots of ideas about how to use it in future projects.

Another element I liked about this project was that once again I was able to use stash fabrics & notions for the entire project, even if it meant I had to use two different types of lining for the body and the sleeves. 

The pattern included little patch pockets, but I didn't like them with this version - I was going for streamlined. So I didn't add them. I did shorten the sleeves (always) but not the body of the jacket. And my main change to the pattern (besides the buttonholes of course) was to extend the placket on the right side by 1/2" to accommodate the size of the book buttonholes. This was a cute pattern even with a few small issues with the instructions - it all worked out and I'm very pleased with this little jacket. The Sewing Bee really forced me to think about buttonholes in a new way!